
Contact: Rich Kurz Page content last updated Feb. 01, 2018
The Construction Diary
2017
JANUARY
A couple of life events put the rest of life on hold.
I was laid off on Dec. 31. I knew it was coming six weeks prior, and the company gave me a generous severance.
But I pushed hard to wrap up my work to hand off to whomever since there would be no replacement for me,
and ended up in the emergency room on Dec. 31 with my heart palpitations.
Meanwhile, my back had become so bad that the doctor gave me serious pain meds to make it thru the holidays.
But the back pain did not go away. An MRI showed it to be a herniated disk.
By the third week of January, I had been flat on my back for two weeks and on 8 Tramadol and 8 Tylenol a day and gone to the ER twice.
Because of COBRA complications, I could not do surgery.
Long story short, we called some acquaintences we know who do street ministry and healing prayer to come over to pray for my back.
That night I began to sleep more.
The next day I began to eat, we changed the frequency I took the pain meds at, and the pain began to sloooowly go down.
In two days I was able to ride in a car.
By March I could begin workouts at a gym. By May I stopped all pain meds.
By June, I felt well enough to begin looking for work and start doing regular activites.
And all without surgery.
FEBRUARY-MARCH
As I was able to sit up again, I began computer work on the car, working out the lines of the car from my Detroit photos.
JUNE-JULY
I decided to put the real wheels on the car, which meant I needed to commit to a final tire size.
But that meant I needed to solve the transmission gearing problem.
To use the 13 inch wheels meant an engine highway cruising speed in the low 60s and an all-out max speed of maybe 85.
How to increase the gearing?!?!?
It could not be done with the stock VW 412 4-speed gearbox.
And the gearbox countershaft gearing was a machined one-piece part.
Gears could not be swapped out.
So, what tires would get a cruising speed of 75 MPH.?!
The best tires that matched the diameter of the original Monza SS were 175/70R13 (or 165/75R13s) with a rolling diameter of 22.62 inches.
And the rear tires need to be fatter than the front to help compensate for the rear weight bias.
And that meant likely a greater diameter (just like on the Monza SS, which would help out the crusing speed!
The rears worked out to be 205/70R13.
So, what about gearing?
Back to the Porsche 901 and 915 transmissions.
I finally consulted with the local VW shop of reputation.
"Use the Type 2 bus 091 transmission" he said. "It's sturdier, cheaper, and can take different gear sets."
So I called Weddle Industries to ask about building one for me.
They don't build them up anymore - they just sell parts, but they recommended a couple of shops in Colorado.
I contacted Greg Sayer "Mr Gas" in Colorado Springs.
"Why not use the Type 1 box? It's cheaper still, and can accommodate a larger selection of gear sets."
After exploring the fit of the different gear boxes, plus different nose cones for the Type 1,
I settled on the Type 1 with a Type 2 211 nose cone and a taller 4th gear.
The calculations say I should do about 3300 rpm at 75 mph with 205/70R13 tire on my 13x5.5 alloy rims.
The Porsche 915 transaxle would also have achieved that, but at an added weight of 40 more pounds.
I will try living with a 4-speed.
If I don't like it, well, there is a 5-speed option for the Type 1's.
I will to order a hydralic clutch slave cylinder.
AUGUST 4-5
While waiting for the transmission, I tried putting the master cylinders back on the pedals. . .
only to discover I had welded the pedal assembly on upside down.
Well, that only took an hour to fix, and the master cylinders went on.
Now I am measuring the brake and clutch lines to make replacements. . . and remembering how it all was routed.
RUST!
The chassis was tarped all winter, but its surface eroded in the sun and moisture seeped thru.
I had a 2nd tarp under it, but it dropped and spilled out when water puddled on it.
What's more, even under the 2nd tarp, condensation happened each morning.
The pan, the master cylinders, and the shifter all developed fresh rust.
Only the steering wheel escaped because it had a bag over it.
So I dried it out, removed the shifter and cylinders, and began cleaning them up again.
The brake paint on the masters did little to deter rust.
Then I discovered the derusting paint I would spray on, which worked nicely to convert bare iron and rust to black oxide,
could be wiped off with alcohol . . . which explained other rust that happened on parts already on the car I had sprayed with it.
Water dissolved it!
Clean it all up and use REAL paint!
AUGUST 16
I picked up the transaxle.
I also had a good long talk about paint with the shop owner next door.
I had stopped in only to ask for the nearest House of Kolor (HOK) outlet.
He had some valid critiques of HOK, and showed me his R+M paint system combined with his computer database that allows him to match about any color out there.
I got to see a C3 Vette he had just restored and repainted in an original shade of Trophy Blue Metallic.
He also just repainted his work pickup in a solid red with a clearcoat.
There was no orange peel in it that I could see - and he had not yet rubbed it out!
I was impressed. I will talk with him when it comes time to paint.
AUGUST 17-31
The last two weeks was spent figuring out what parts I needed for the clutch.
My rebuilt engine had a 228 mm flywheel, which worked for the 412 transaxle, but for a Type 1 transaxle,
it would require grinding out material in the bell housing for the pressure plate plus a 1/2 inch spacer for the starter.
I did not like the thought of thinning out the bell housing.
But I had a 210 mm flywheel that had been bead-blasted.
The engine rebuilder wouldn't use the bead-blasted one because out of concern that the threads had been affected,
but the local VW expert thought it was good enough for him to use if I polished the bearing surface and used a chase on the thread holes.
Looking at the Porsches in his shop, I believed him.
For the brakes, I realized I needed a proportioning valve, which was no longer on the 412 donor. I ordered a Willwood model.
I wondered if I could use solid connectors to pass the brake lines thru the ends of the pan.
Yes, but it would require custom-made sections of line with two different-sized ends and costing maybe $200.
So I bought grommets to seal the line holes just like the original car.
And maybe a touch of windshield sealer.
Okay. So I knew what to use and my orders were placed.
I have cleared off the engine crate and am getting ready the 210mm flywheel.
I wirebrushed the new transaxle to revive its appearance.
I trimmed a strake on the nosecone to fit in the axle carrier tunnel and added the clutch line bracket.
I am wirebrushing the master cylinders, again, and am preparing to shorten the two safety brake cables by about 10 inches.
The shifter and shift rod have been derusted and painted.
My new specs are as follows:
BRAKE SPECS
Brake lines:
Brake hoses to reservoir:
3/16", bubble flare
7 mm ID, 3 mm tube thickness
CLUTCH SPECS
Flywheel:
Drive shaft input:
Clutch lines:
210 mm
3/16", 24 spline
1/4" or 6 mm, bubble flare
SEPTEMBER
Replaced the old tarp with a section of a silo grain bag.
Cleaning up the fan housing, ordering yet more engine components.
Decided to use the larger CVs for the 412, which meant swapping out the Type 1 CVs.
And finally settled on tires!
Much as I dislike using Asian parts, I simply had few choices available for 13 inch wheels.
Actually, only two choices, with little difference in diameter and tread width.
But I found Taiwanese-made Nankang tires that would give me the right diameters front and rear, but I had to sacrifice some tread width.
What I ended up with was a set of tires very much like the originals on the Monza SS.
What I bought were Milestars:
TIRE SPECS (Fr/Rr)
Rim:
Diameter:
Contact Patch Width:
Tire Size:
13 inch
22.5" / 24.5"
4" / 4.5"
Milestar MS775 P155/80R-13 / P175/80R13 86S
OCTOBER 1-10
I decided against the 90mm CV flanges in order to use the larger 100mm flanges.
I decided that bigger was stronger and therefore safer.
The caps were WELL sealed and required serious digging and prying to pop them.
Swapping them out was easy... once I got a C-clip tool for the circlips.
I replaced the 228mm flywheel with the 210mm.
I discovered that there was no drive shaft bearing behind the the flywheel, so I installed one, plus a new plate for the flywheel bolts.
The clutch slipped on fine and the pressure plate tightened down nicely to 14 ft/lbs torque.
Next comes collecting the brackets, screws, seals, and missing parts - as well as identifying unknown parts (thanks, Vrba).
More cleaning, wirebrushing, and painting: the fan housing, the fuel system parts, the engine cover tinwork, the distributor.
I also changed my mind about how to heat the passenger compartment. I thought I would try a 2nd oil cooler and switch between the orginal and the 2nd for heat.
Collective wisdom on TheSamba was 'Don't Do It!' First of all, I don't know how much heat I would capture.
Then, the big problem is upsetting the oil temperature in the engine. It needs to be around 185 degrees C.
I could likely take too much from the engine to heat the cabin.
So, I will revert to the original exhaust heat exchangers and pipe that in.
Since it is only a 2-passenger and now 10 inches shorter cabin, I am hoping the heat will be adequate down to freezing.
I also decided to use the VW412 oil filler/dipstick position located at the rear of the engine to the lower right of the cooling fan.
The one from Original Customs sticks out the top and adds a good four inches of height I would rather lose.
OCTOBER 11-31
AT LAST - I BEGIN INSTALLING THE ENGINE!!!
It was time to roll it into the garage and put it up on jack stands.
I do not need to build up the engine, but to take advantage of the late fall warm weather, it is time to fit the engine to the chassis.
I bolted the transaxle to the engine and tentatively positioned it and added engine tin to see how it looked.
Not too bad!
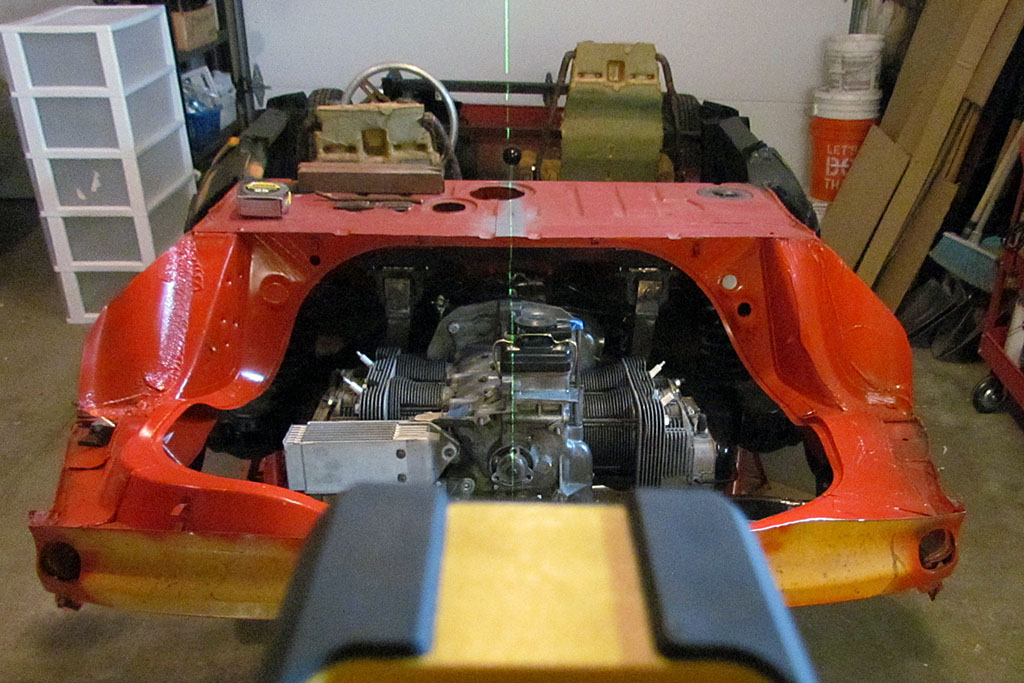
Then I had the idea to check if it was centered using a laser level. It was off to the right by 2 inches.
I can't imagine VW doing that, so I am guessing the difference is between using a bus rear engine mount in a VW 412.
Visiting my local VW parts yard failed to turn up a 412 mount, so I call on my neighbor and we begin cutting and welding the bus mount.
It centers up as dead-on as I know how to make it. It took three days to work thru that problem.
After making sure the nosecone is centered, we build the transmission mounts.
This requires fabbing a bracked on each side to go from the Type 1 mount under the bell housing to the upper rubber mounts from the 412.
Once in place, they stiffened up the engine so it did not rock at the slightest touch. Those new rear carrier rubber mounts are real springy.
So those brackets needed two days to solve.
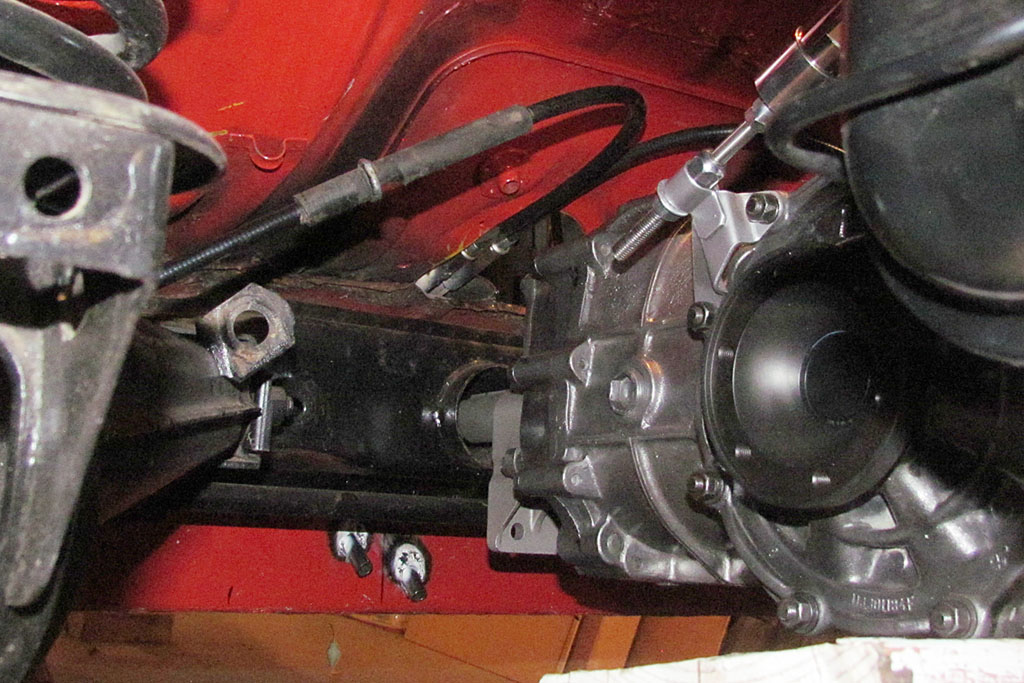
Finally we could address the nose cone.
The original style Type 1 nose cone mounting bracket would not fit in the tight clearance between the nose cone mounting plate and the axle carrier.
After a lot of back and forth ideation, we came up with a solution that welded onto the underside of the axle carrier and would unbolt from the transaxle.
After it all welded together, the engine was firmly aligned to the shift rod. That part took another two days as well.
The last weekend in October saw me installing the brake and clutch lines, mostly using off-the-shelf components, but with a couple of custom lengths.
I also went back to adding oil thru the oil breather and using the top dipstick.
I will do the accelerator cable next, and then figure out how to fit the bus engine tin, which is now 2 inches to the left.
Then I will pull out the engine, tighten up the bolts, and finish building it up.
After that, I will make gas tanks and run the fuel lines, followed by the wiring harness, the dash and gauges, and the rest of the electrical.
NOVEMBER
Work slowed down due to picking up a new job at an auto parts store.
Never done retail before and it is stretching me.
But it is also taking up lots of time - more than just the actual hours put in.
Then came cold symptons, then came the holiday, and in December 20 hours a week became 30.
It was the least holiday-like season we have experienced.
I finally realized how much I valued my time and was in a time of life in which I did not need to do this.
I gave notice and a new freelance job commenced in Jan. giving me flexible hours.
I did one final check of the engine centering before pulling it out again.
I measured the gap with the half shafts in place and discovered they were effectively equal
as they should be, being only off my 1/8 inch - within measuring error.
I began to build up the gas tank on the driver's side using house insulation foam.
I want to use the space between the front wheels and the door and between the dash and the fender.
My goal is at least 5 gallons per side.
In order to squeeze in more volume, I decide to modify the framing to the dash and from the dash to the side posts.
That made it so the tank can be unobstructive up and down without running into framing.
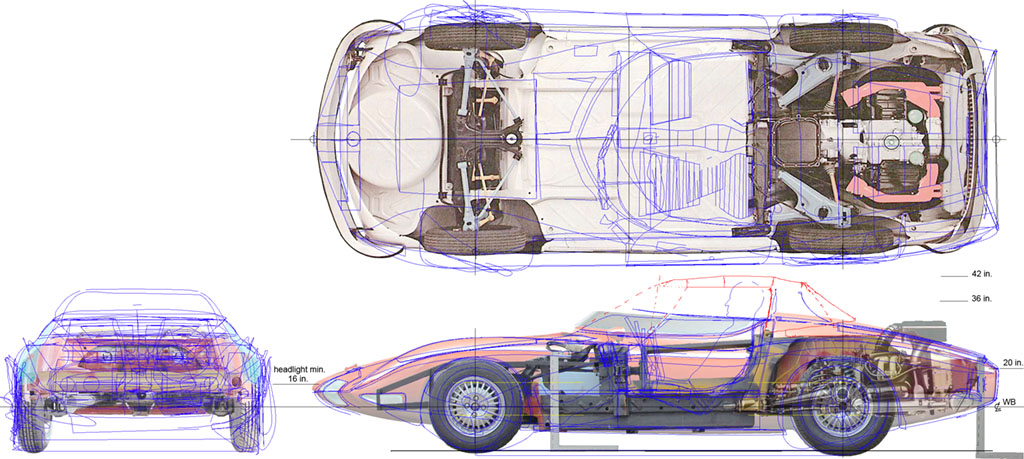
I also worked and studied my contour drawings and believe I can get at least 6 gallons now out of the space.
But I will loose some to the heat ducting running to the front dash fan, running under part of the passenger tank.
Before the engine came out, we tried to get the shifter in place and working.
But I could not connect the rod to the nose cone.
So we cut it in two and made it to bolt together, but still could not.
The answer is to attach the rear half to the nose cone BEFORE installing the engine.
It will make the install a little more complicated, but I see no other way.
The new transmission shift rod stub is shorter than the 412's, and it makes a difference. Aargh.
I ordered in 2 inch flexible steel tubing for the hot air ducts from the engine to the interior and dash.
They will come in under the seats and switch from either out from under the seats
or around under the side frame to the dash blower for windshield defrosting.
They will run under the gas tanks, and really, I may only need one to the blower.
DECEMBER
I decided the best thing to do was build up the engine and install it,
thus freeing up floor space and shelf space.
But working between five to seven days a week, nothing got done thru the holidays.
So in Jan. I drilled new spark plug holes in the engine tin,
trimmed off an inch so make the driver-side tin fit the engine compartment
opening after shifting the engine over when centering it, fitted the fan housing,
put the tinware on, bolted on the alternator, adjusted the cooling flaps,
and discovered where the thermo timing switch went.
Check out 2018 for more progress!
BRAKE SPECS
Brake lines:
Brake hoses to reservoir:
3/16", bubble flare
7 mm ID, 3 mm tube thickness
CLUTCH SPECS
Flywheel:
Drive shaft input:
Clutch lines:
210 mm
3/16", 24 spline
1/4" or 6 mm, bubble flare
TIRE SPECS (Fr/Rr)
Rim:
Diameter:
Contact Patch Width:
Tire Size:
13 inch
22.5" / 24.5"
4" / 4.5"
Milestar MS775 P155/80R-13 / P175/80R13 86S
The Build--2017
June - July
1st ROW
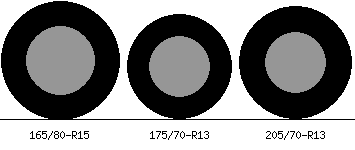
(L) Reference chart of the different dimensions of a wheel and tire
(C) Tire size comparison between a VW 412 (165/80R15) and the Monza SS front (175/70R13) and Monza SS rear (205/70R13)
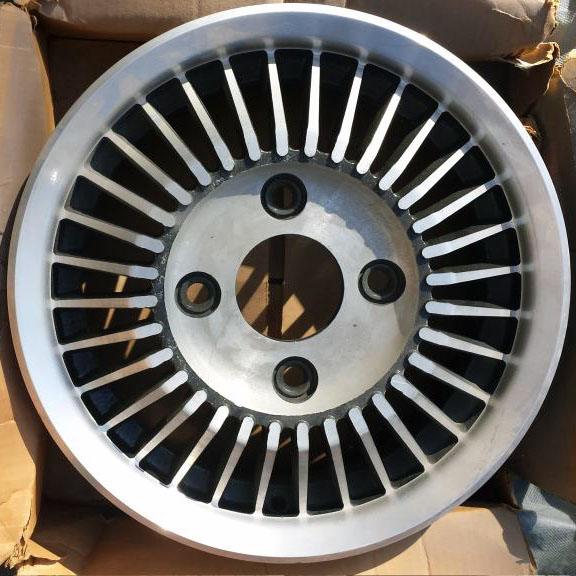
(R) The best production wheels to match the Monza I can find - from a late '70s Honda Accord.
Another close match are Western Cyclones, but those are 390x150 mm and have a 4x4.5" lug pattern - too large.
If you have a set of the Hondas, please let me know what are their dimensions!
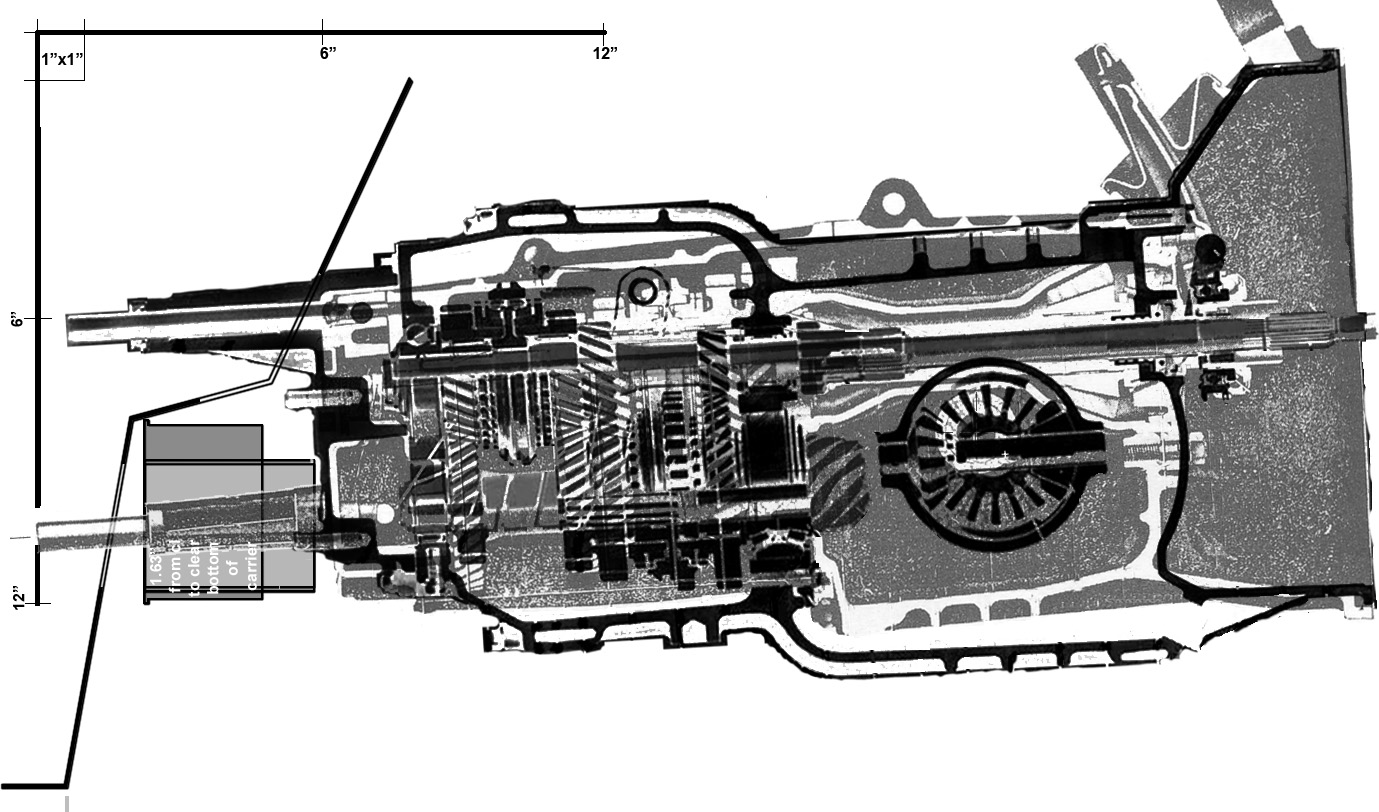
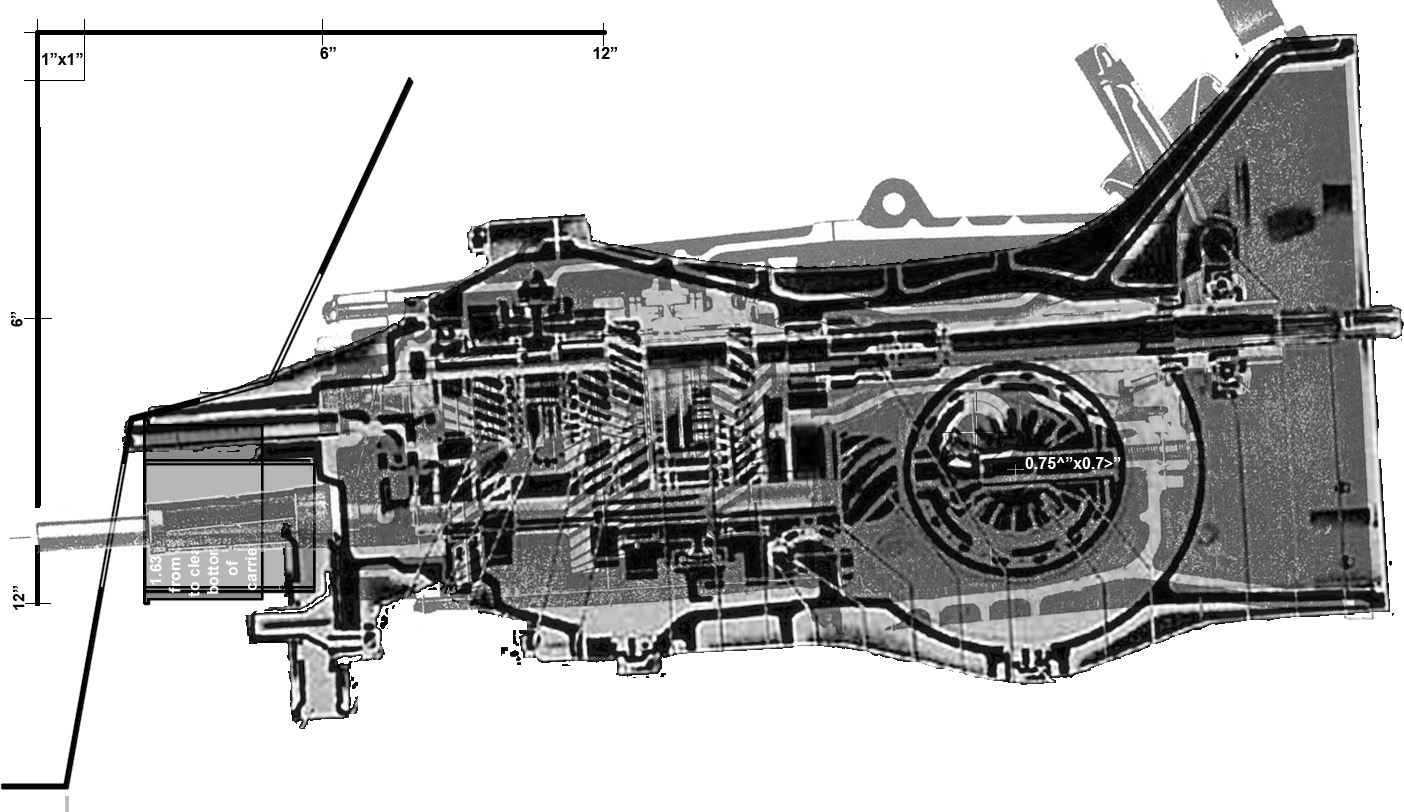
2nd ROW - Transaxle Comparisons
(L) VW 412 original transaxle. The drive line seems to slope about 3-1/2 degrees from the nosecone to the cooling fan.
(C) T2 091 3-rib bus transaxle (mid-70s) over the VW 412
(R) T1 Beetle transaxle (mid-60s) over the VW 412
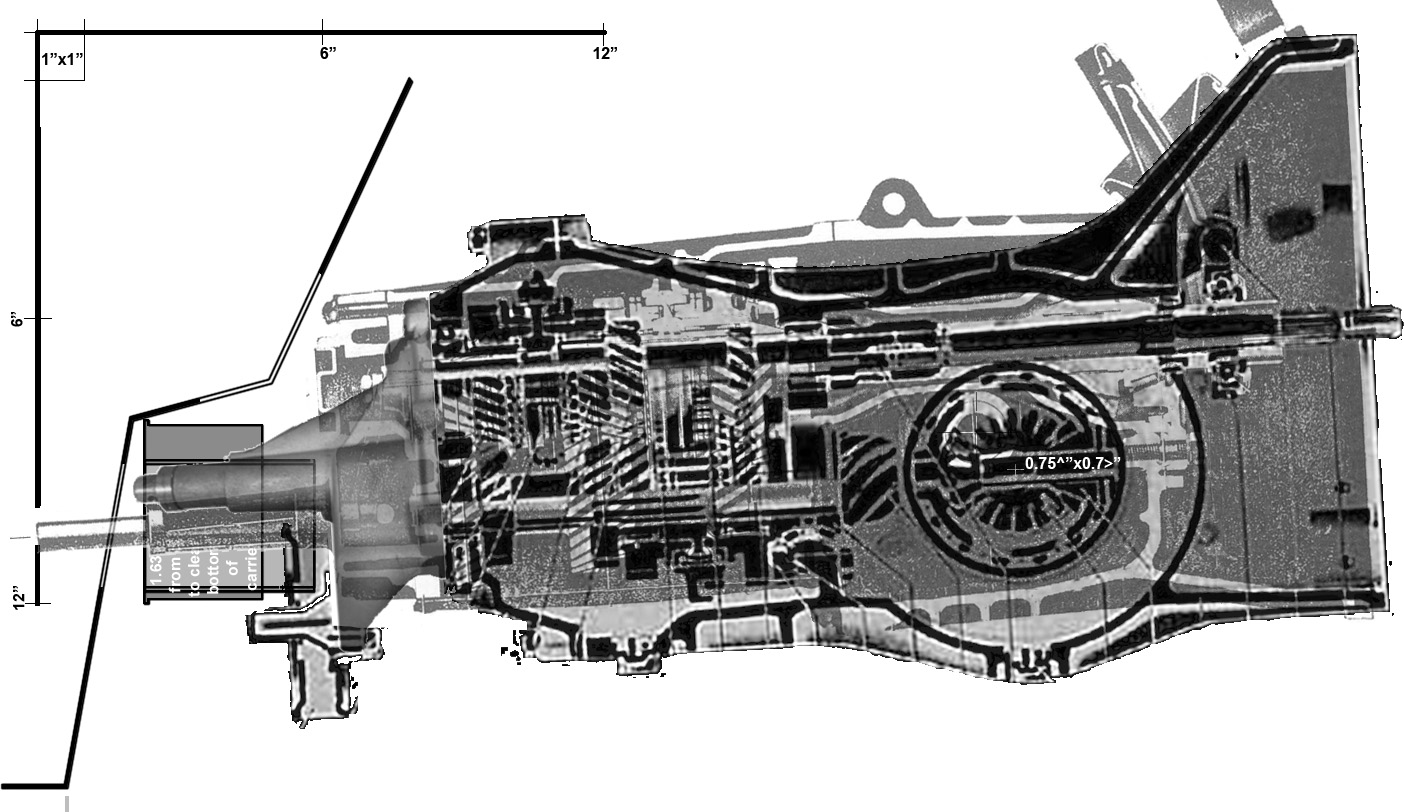
3rd ROW
(L) T1 Beetle transaxle (mid-60s) with 211 bus nosecone over the VW 412
This is to help place the nosecone shift rod shaft into the axle carrier tunnel.
It should also reduce the angling back of the half shafts from the differential to the wheels.
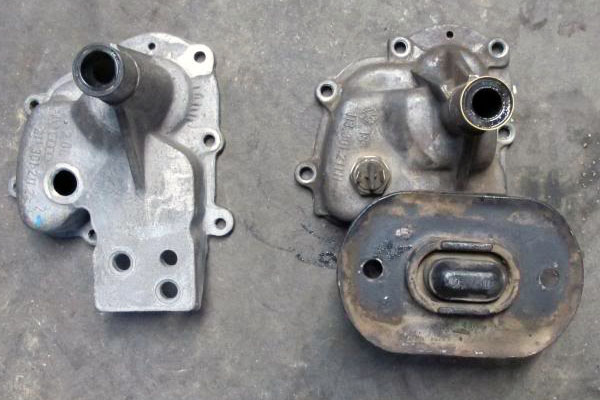
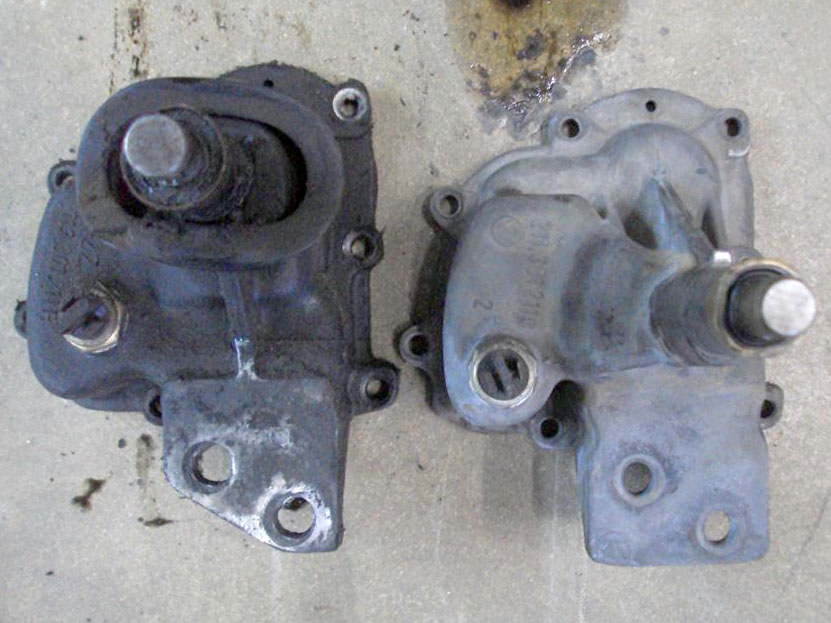
(C) Comparison of the 211 nosecone (left) and the 113 (right). Every inch counts.
(R) Comparison of the 211 nosecone (left) and and yet another 211 nosecone (right).
August - September
1st ROW
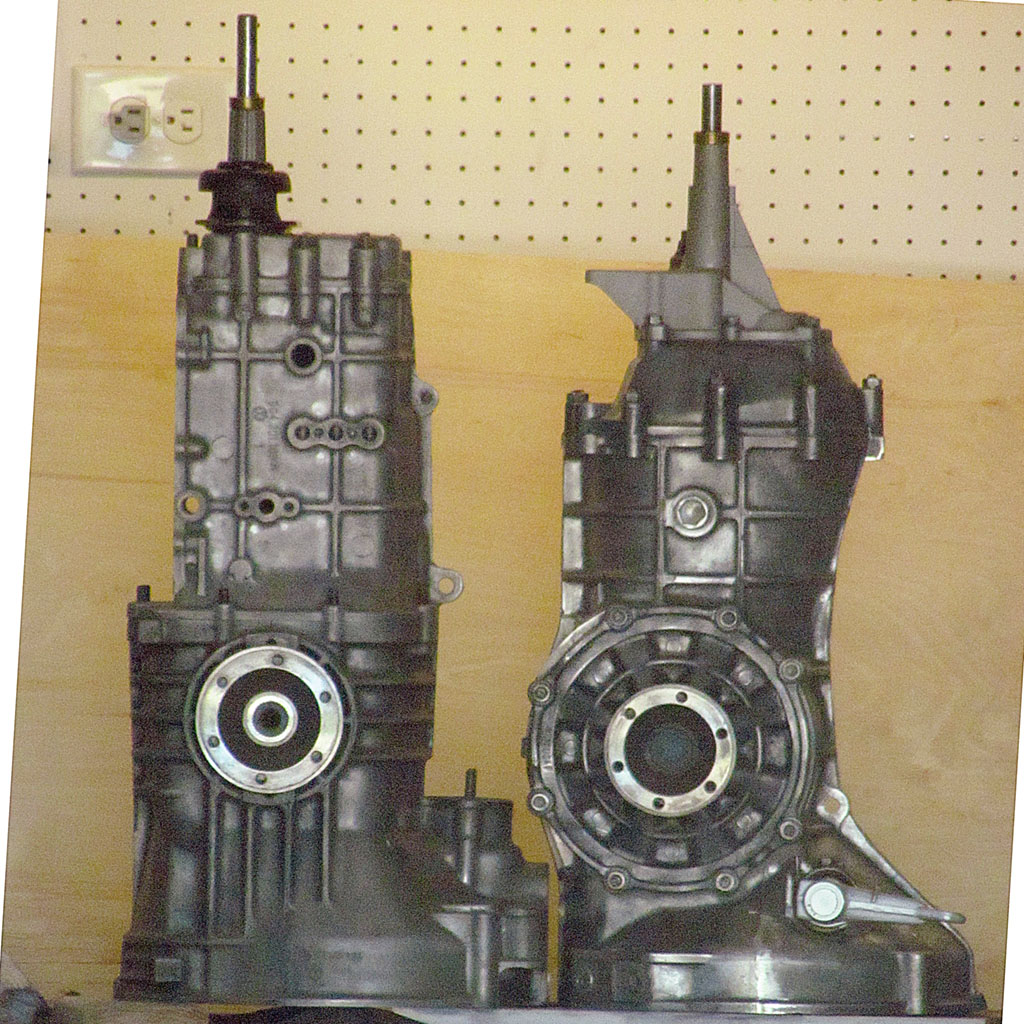
(L) Comparison of original T4 transaxle to the T1 - side view
Note the location of the CVs and the nosecones.
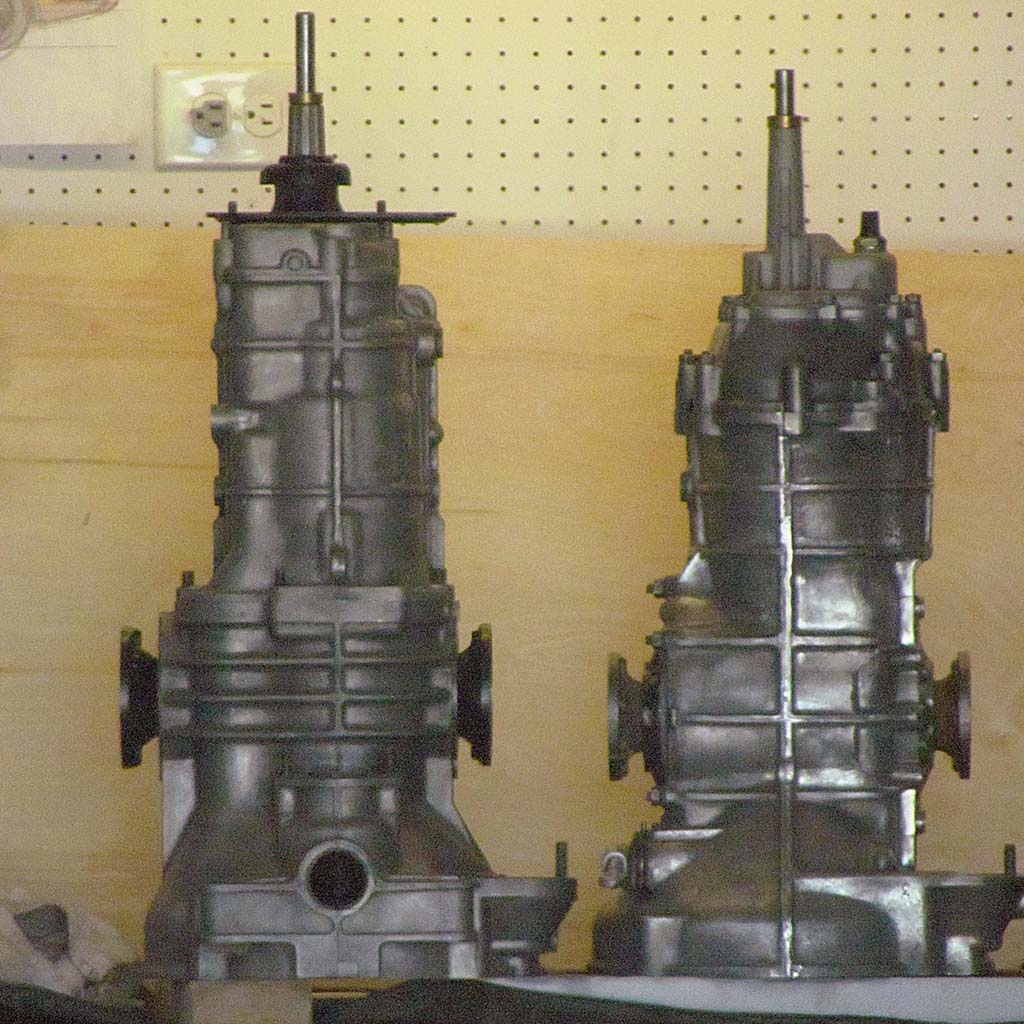
(C) Comparison of the T4 to the T1 - top view
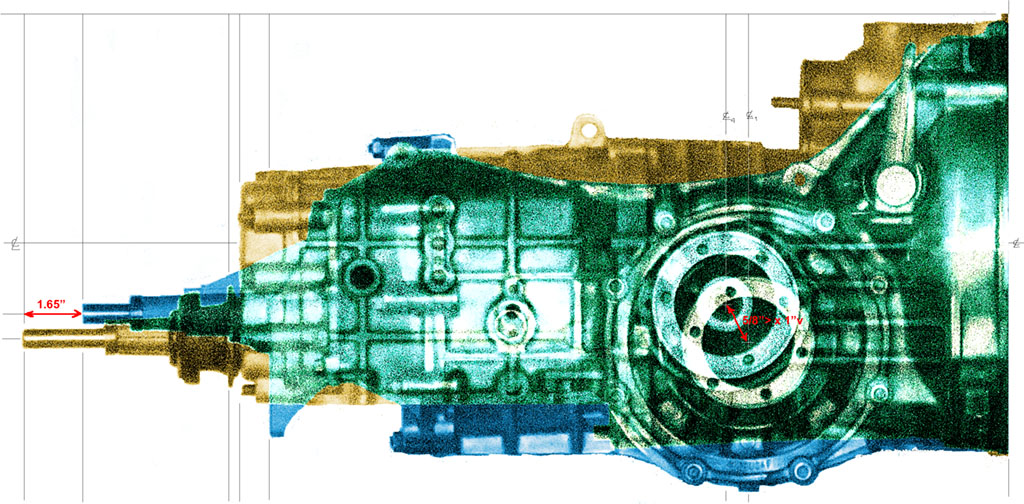
(R) Comparison of the T4 to the T1 - overlaid, centered on bell housing
T4 is yellow, T1 is blue, overlap is green.
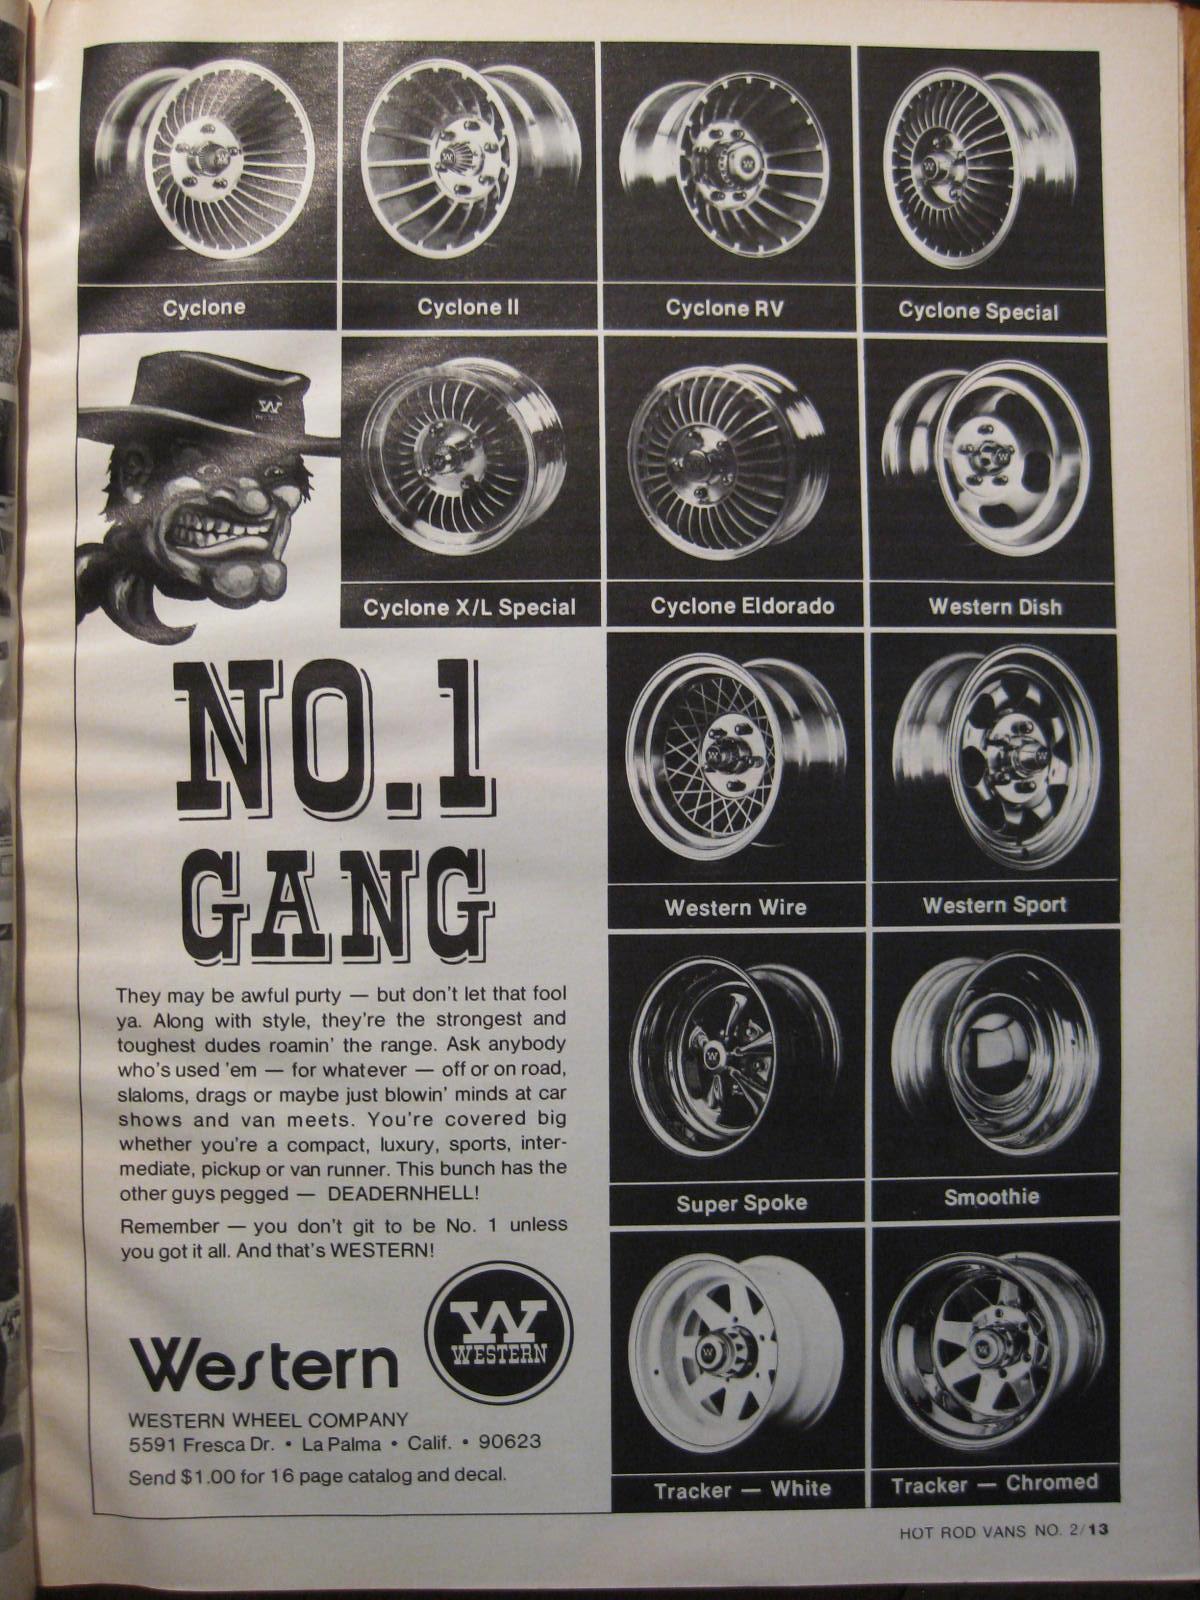
(R) Found this ad for Western wheels. The Cyclone Specials and the Eldorado look like close candidates for 30-spoke turbine wheels.
OCTOBER

1st ROW
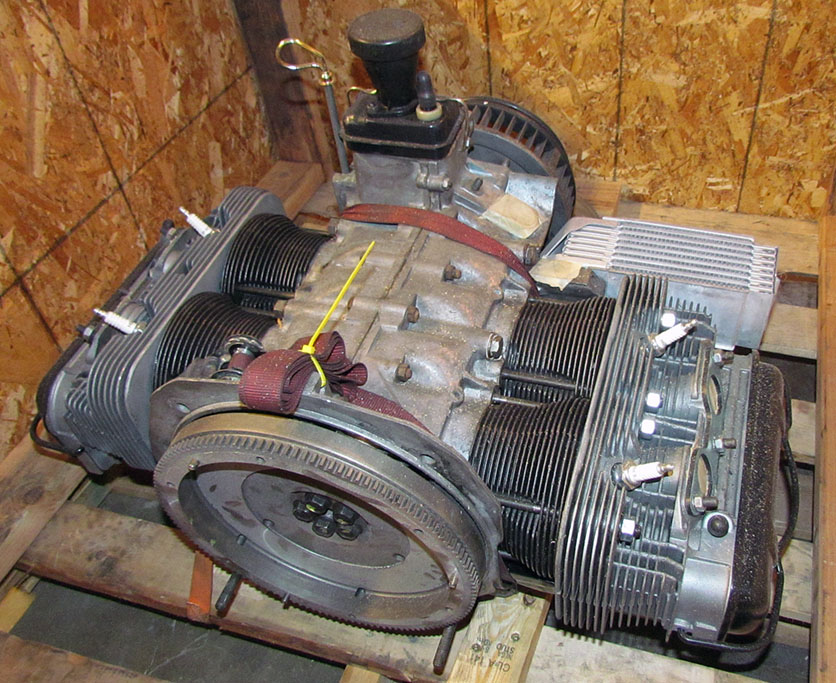
(L) The engine as it came back from Original Customs - front view
Essentially, it is a bare engine. I need to find and attach all accessories.
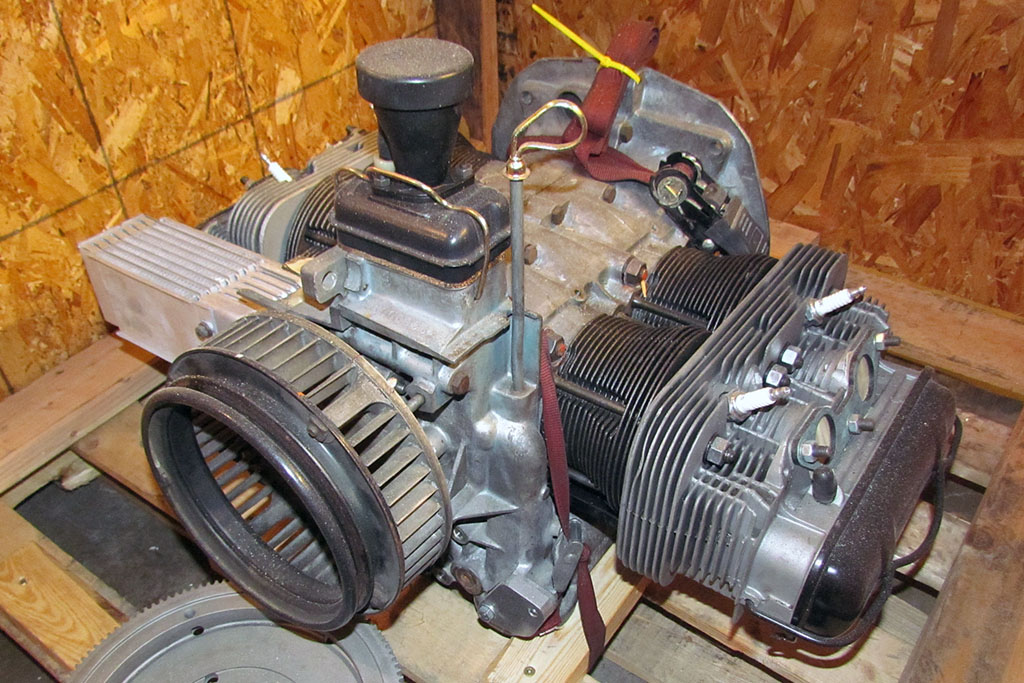
(C) The Engine - rear view
I intend to use the VW412 oil filler/dipstick arrangement out of the plate on the lower right. This will reduce the height by removing the top oil filler and dipstick.
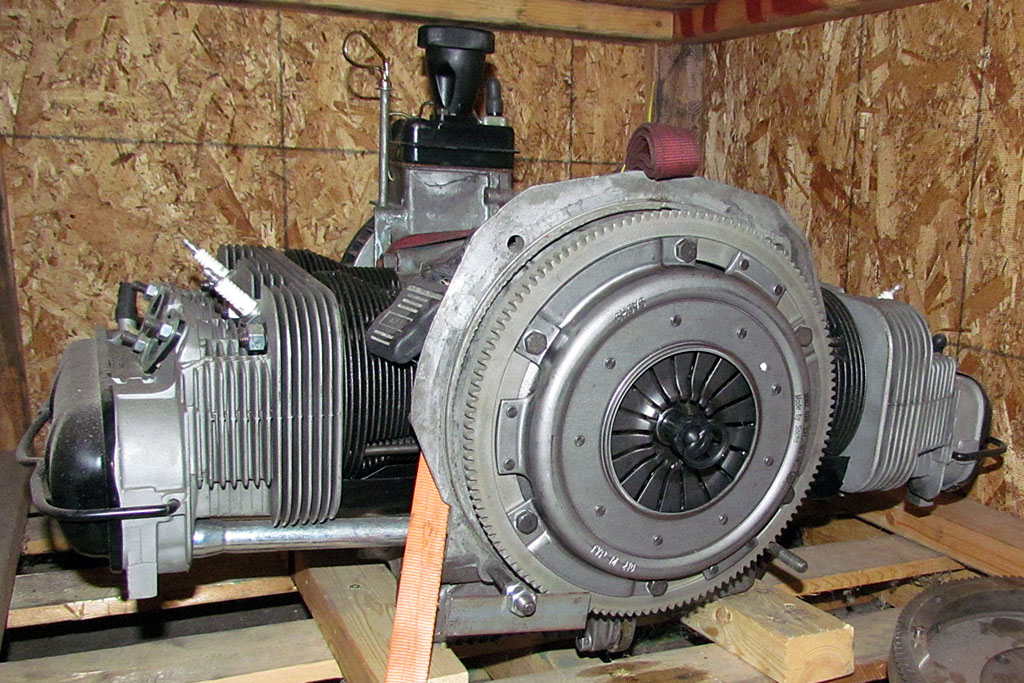
(R) The 210mm flywheel, clutch, and pressure plate installed
2nd ROW
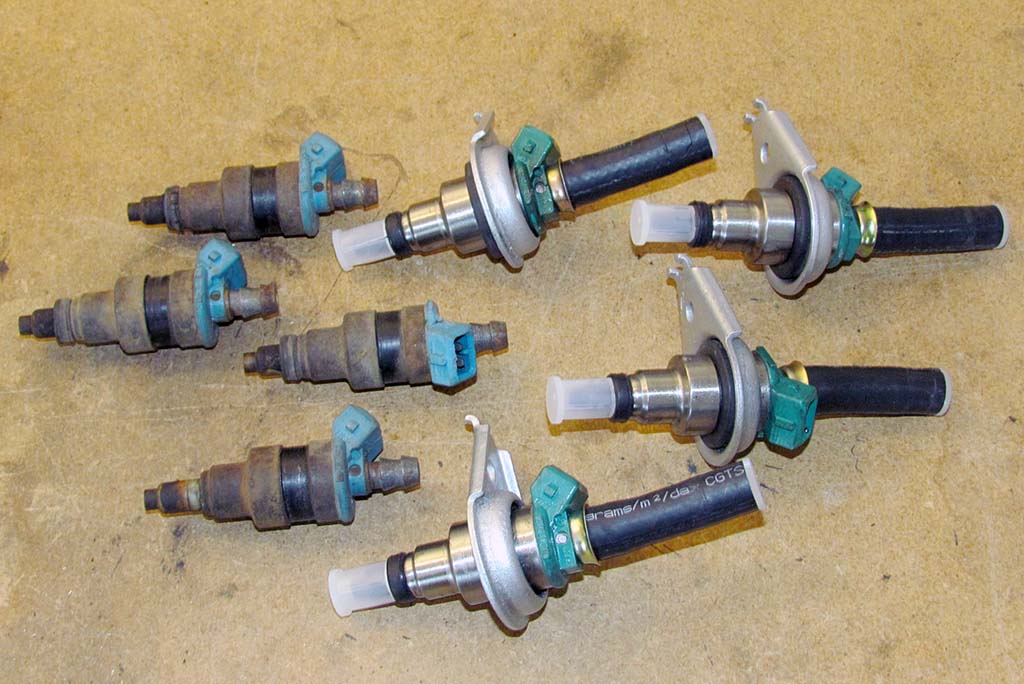
(L) Injectors - old and new
(C) The new aftermarket clutch slave cylinder.
Note also the new 100mm CV axle flanges.
(R) Still thinking about the paint and leaning towards Mazda Soul Red Metallic or Crystal.
1st ROW
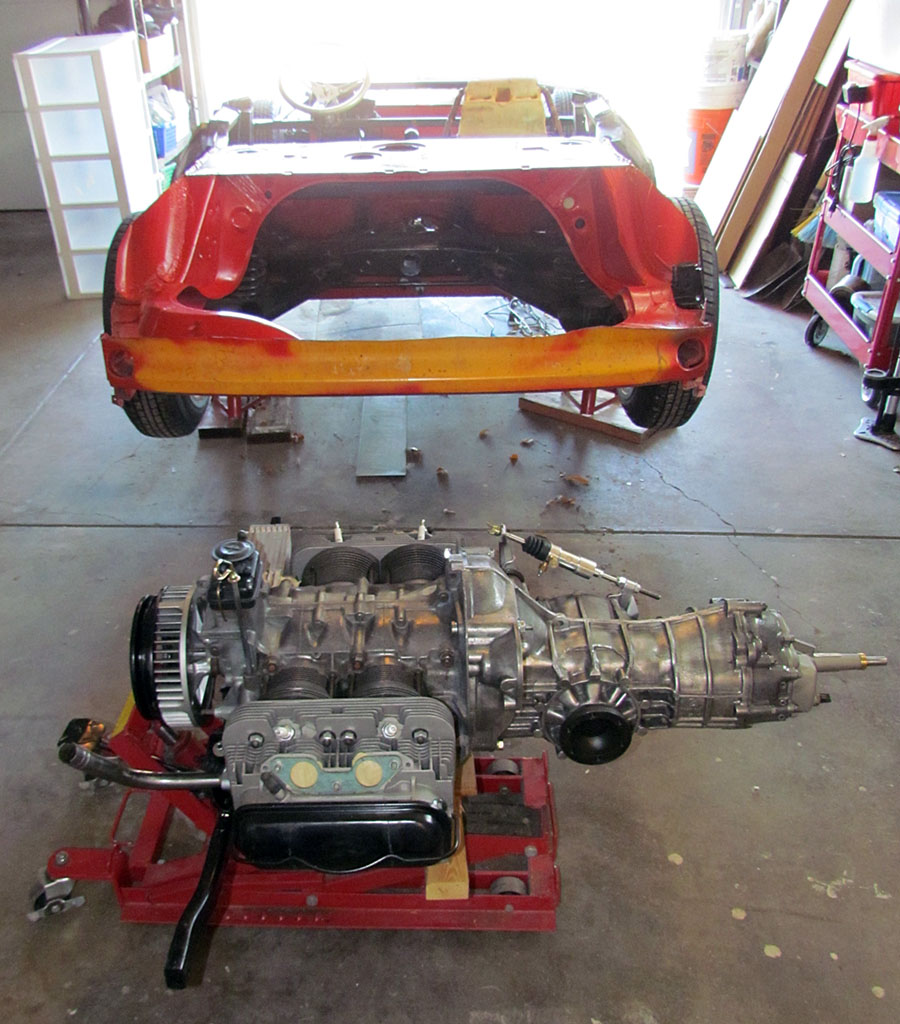
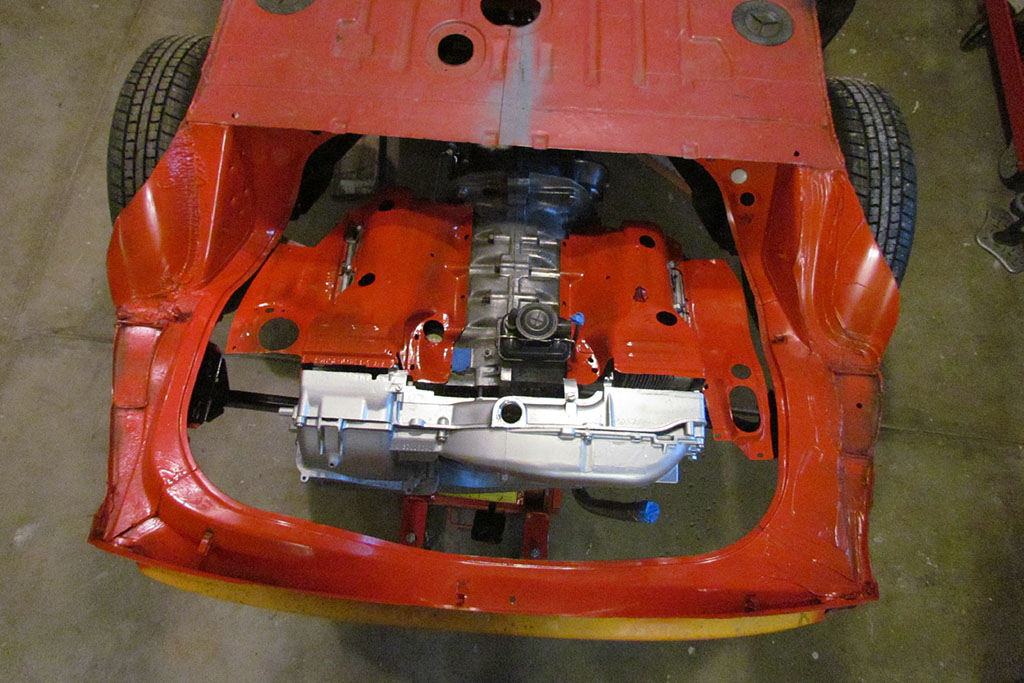
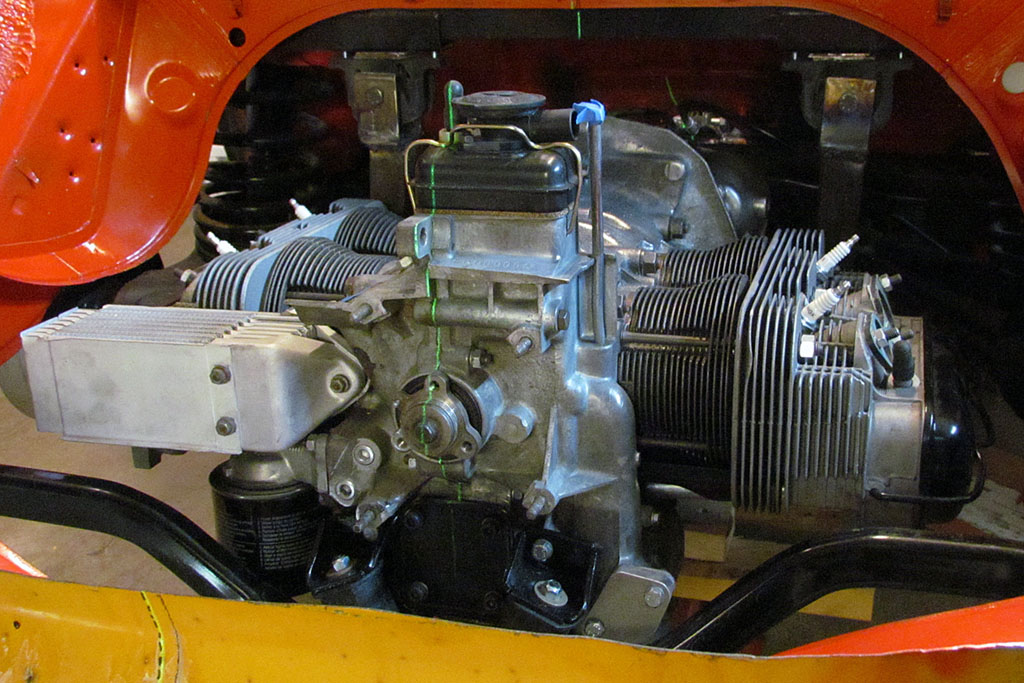
(L) Engine + transaxle bolted together
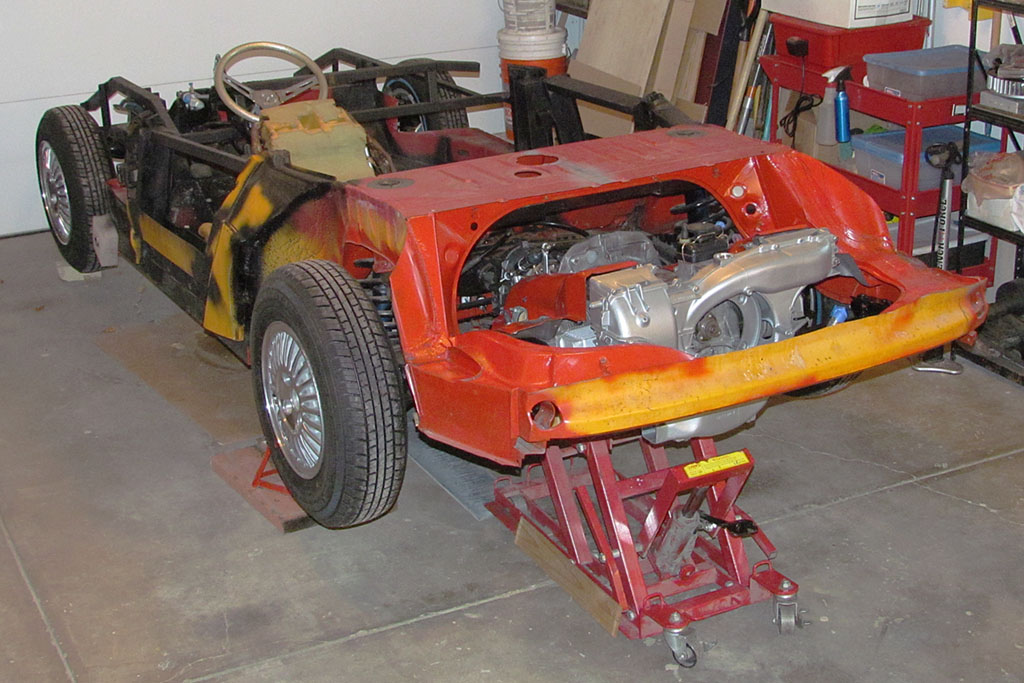
(C) Tentatively mounted in place for the first time
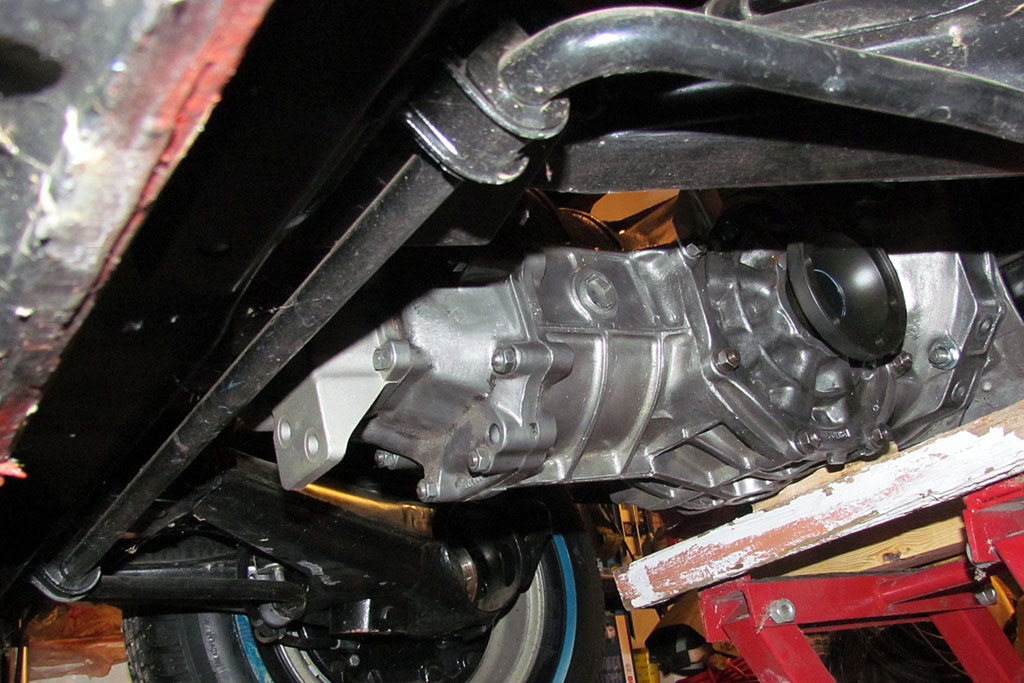
(R) A peak underneath. I am not using the vertical adjustment bolt at the end of the carrier bar.
2nd ROW
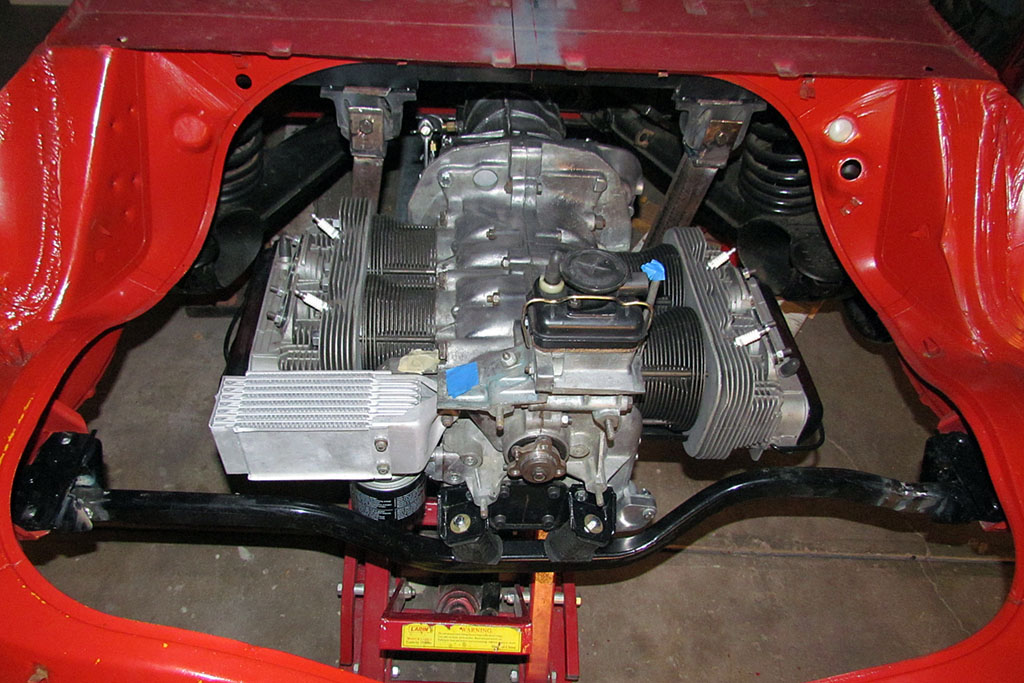
(L) Looking forward to the nosecone entering the axle carrier tunnel
(C) Looking back
(R) Looking down with the bus tin fitted.
1st ROW
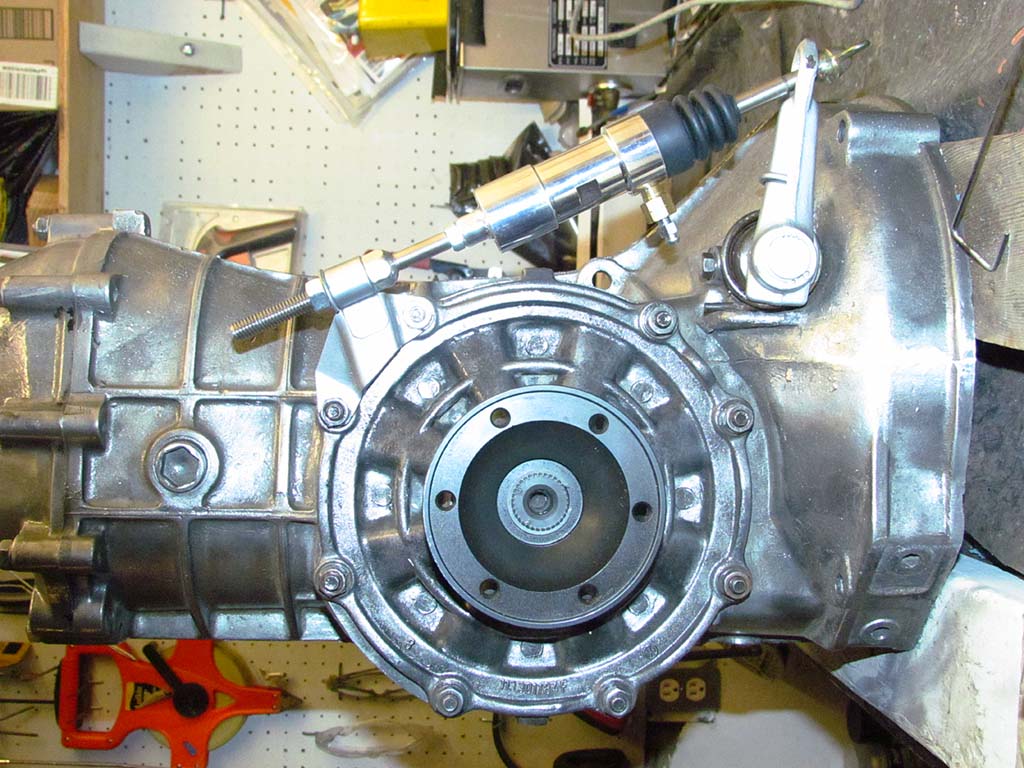
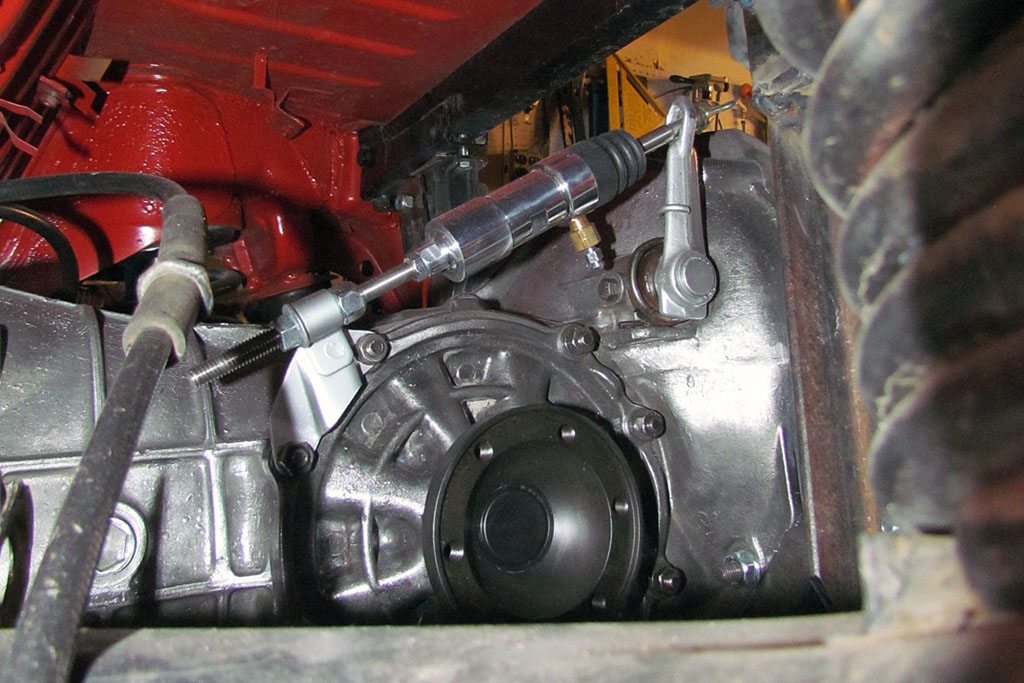
(L) The bolted up engine aligned to the centerline
(C) Close-up showing the centerline running down the case and drive shaft line
(R) The EMPI after-market hydralic clutch
2nd ROW
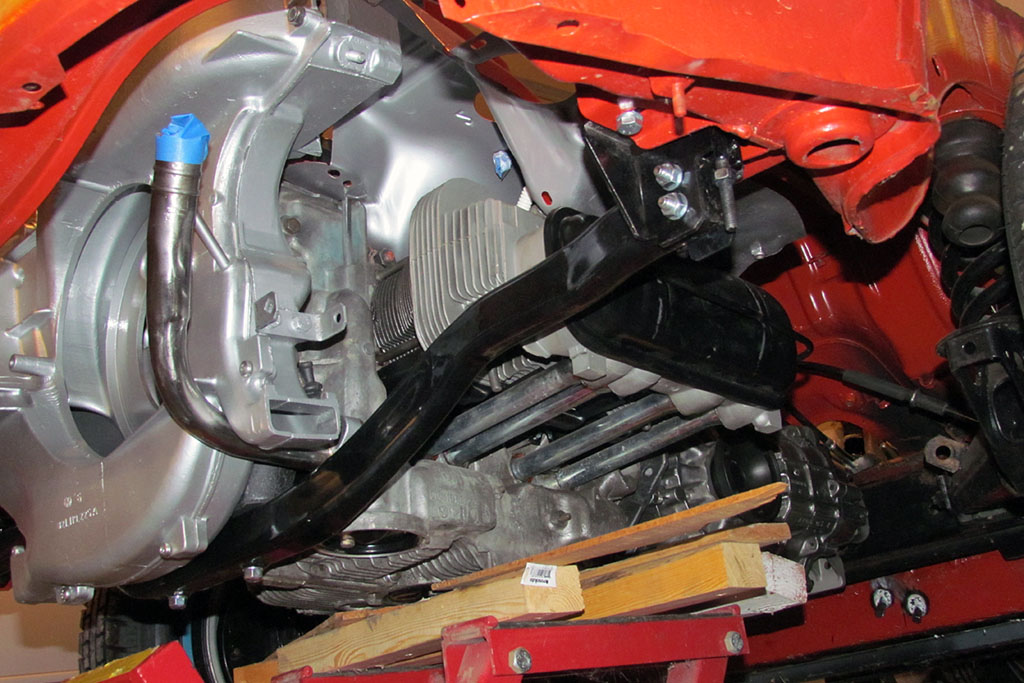
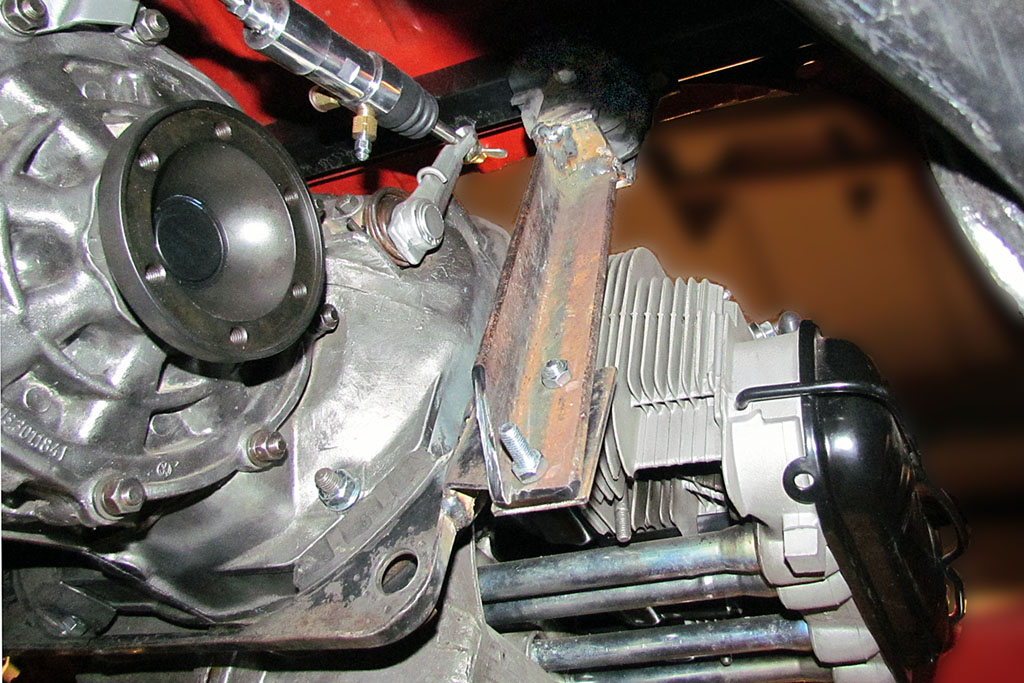
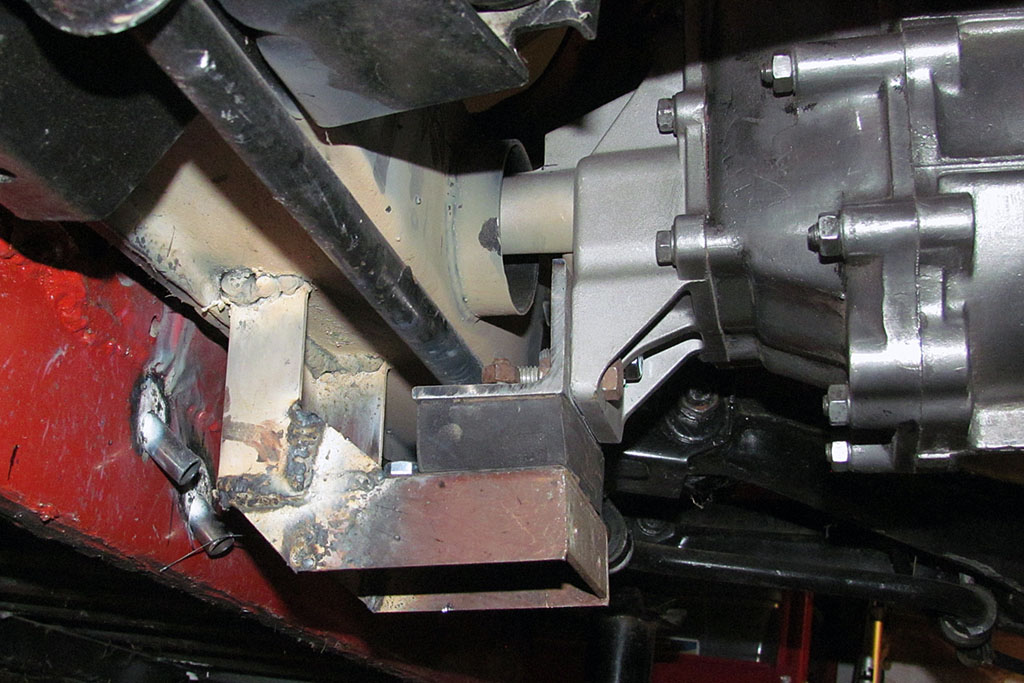
(L) The modified rear engine bracket (note the welds on each end)
(C) Looking up at the transaxle bracket
(R) The nose cone bracket, which had to go around the anti-sway bar
1st ROW
(L) The new brake and clutch lines running along the console
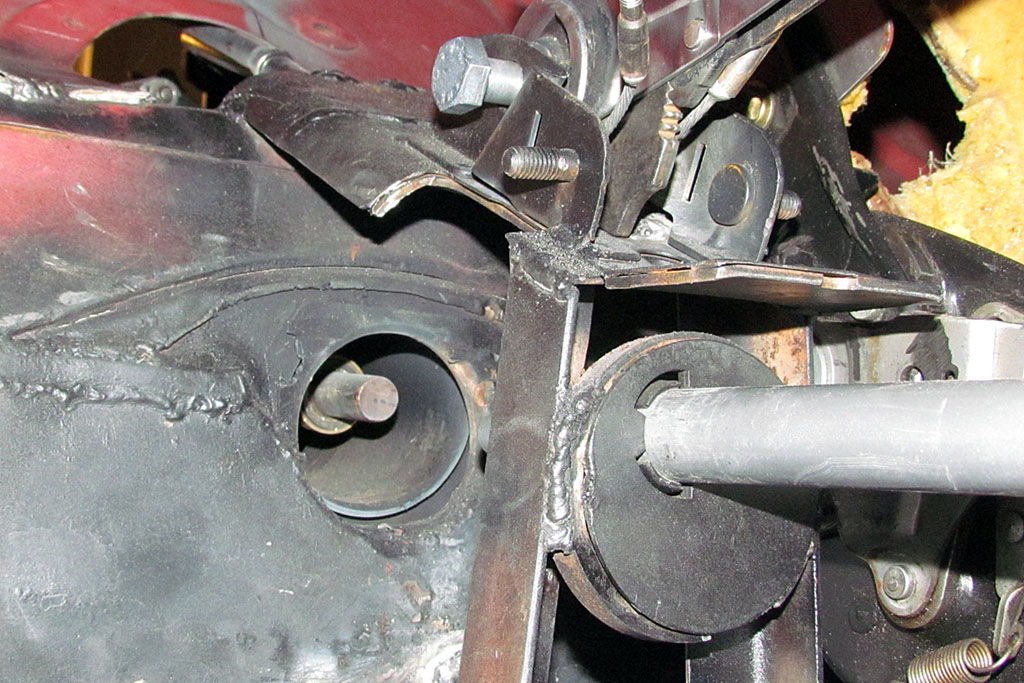
(C) The problematic shifter nub in the nose cone
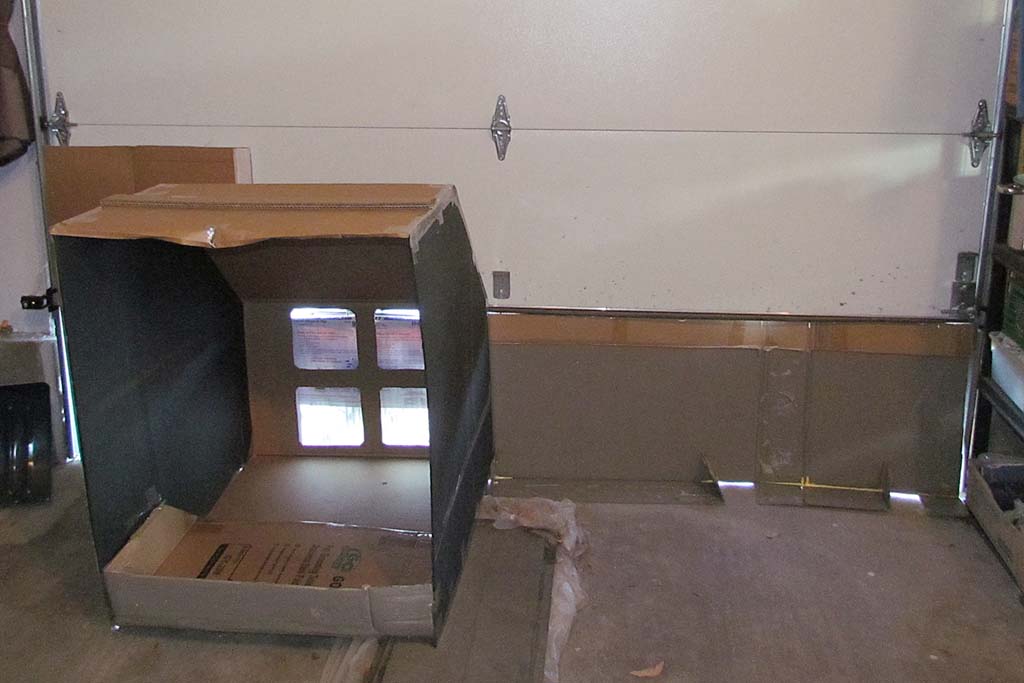
(R) My paint booth for cold-weather, indoor painting
2nd ROW
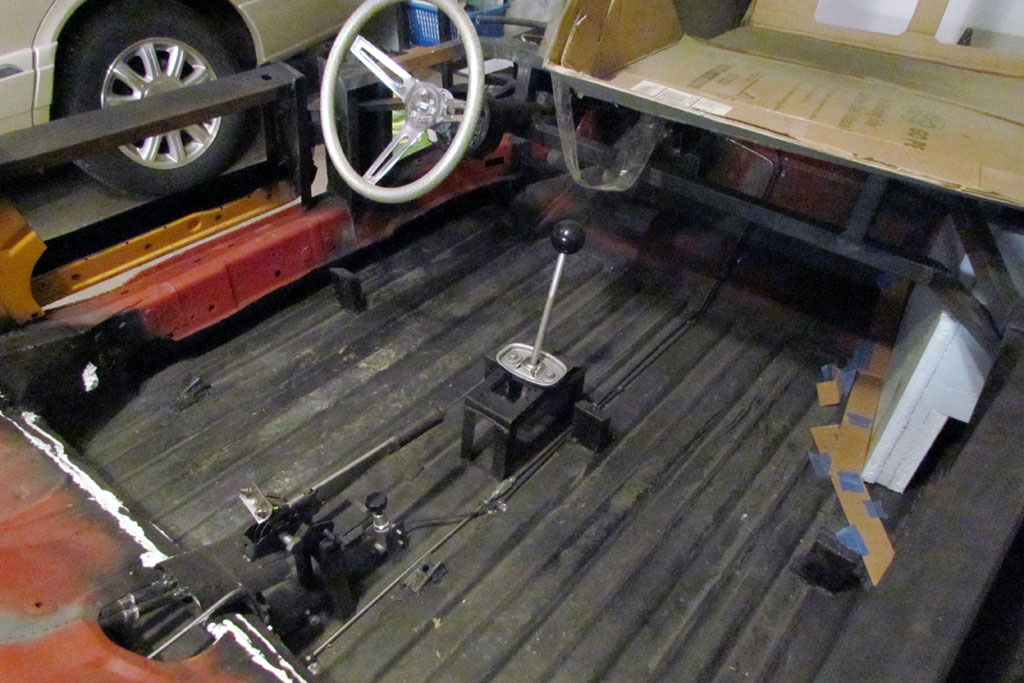
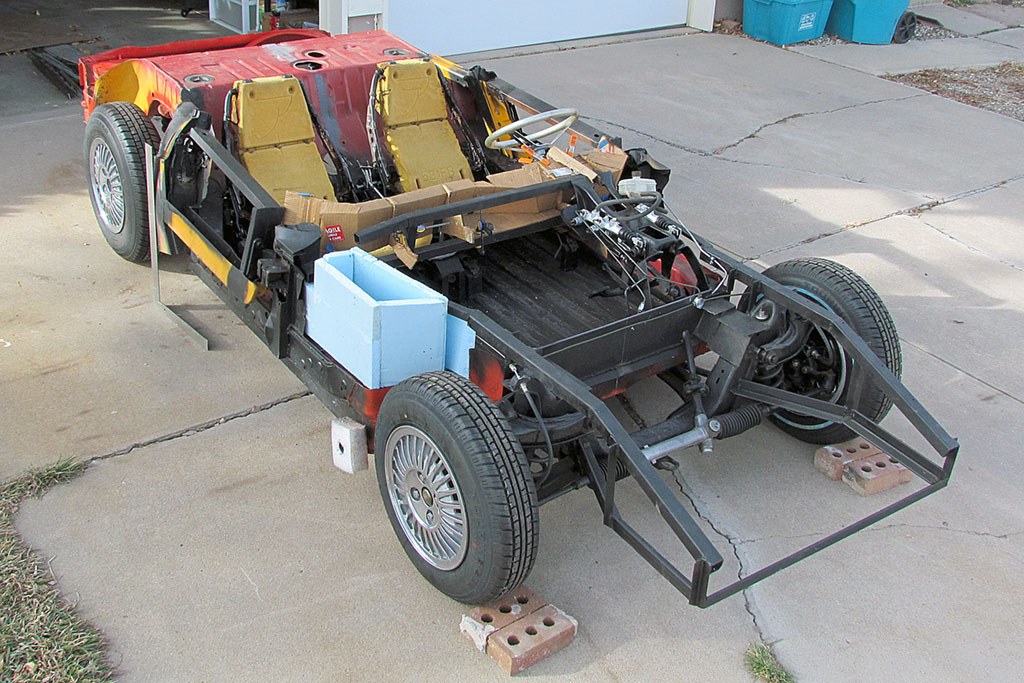
(L) The chassis rolled out and with the 1st gas tank mockup
(C) But will the tank fit? The drawings say it's A-Okay.
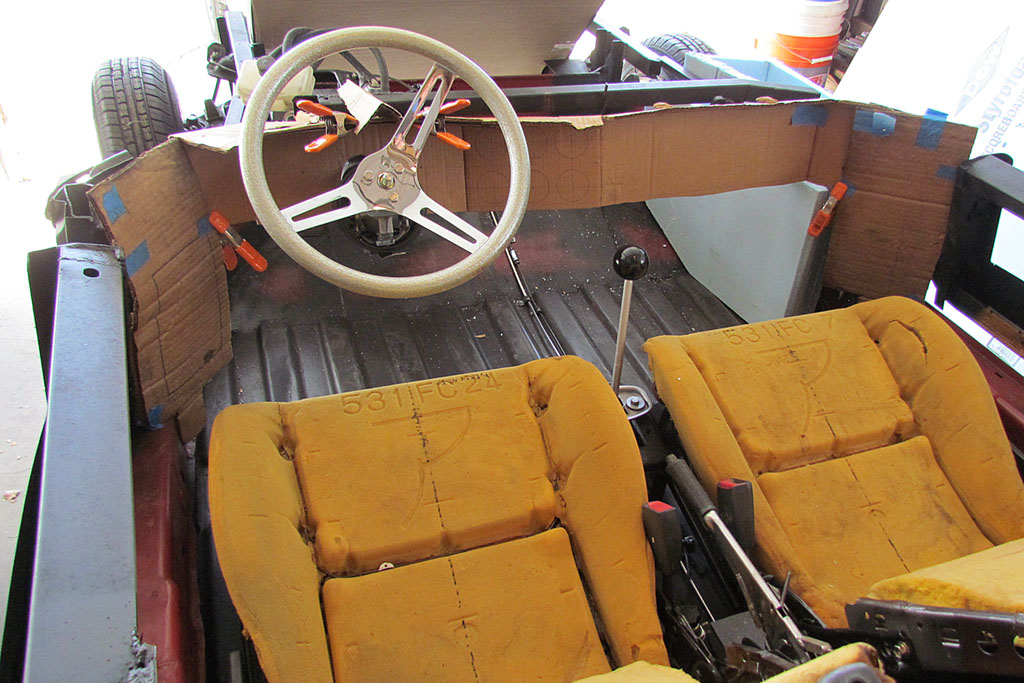
(R) Interior view of the tank, before modifying the framing