
Contact: Rich Kurz Page content last updated May 23, 2024
The Construction Diary
2014
JANUARY 10
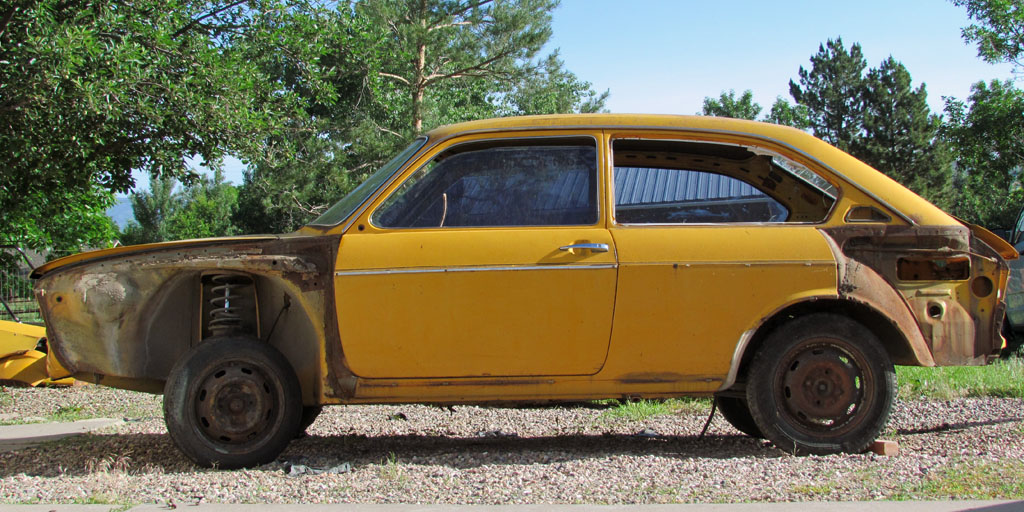
The donor car (with manual transmission) has been selected, but it lacks an engine.
JANUARY 29
Go in to County to determine if it can be licensed in order to avoid the need for a new title.
The existing title transfer was not completed correctly 20 years before.
Therefore, a new title will have to be created for the new car.
It is rather surprising - I don't know why it should be, but both my daughters love the 412!
They want it for their own car. Ouch. It's sorta like a favorite "pet" calf.
We all know what's going to happen to it. I hope I will not have remorse over this choice.
(Author's note: by 2019, I decide if I do it again, I will start with something else.
I, too, regret destroying this rarish car, even though it is not a popular model.
Besides, I ended up cutting away so much, it would have been quicker and easier to start with a 911 chassis or a custom Sterling chassis.)
JANUARY-JUNE
Remodel the garage to increase storage and clear space to work on car.
Begin creating 3-view line drawing from perspective-correction photos.
Research trim pieces and emblems. Determine the following:
• Hood emblem = Corvair hubcap center badge - sorta
• Horn badge = Corvair horn badge
• Tail light lens = C2 Corvette lens
• Tail light bezels = '62 Olds F-85 tail light bezel
• Side name emblem appears to be custom-made
• Trunk name letters = Corvair trunk name letter
JUNE 1-16
Pursue buying Porsche 914 engine. Engine turns out to be wrong version.
JUNE 14-15
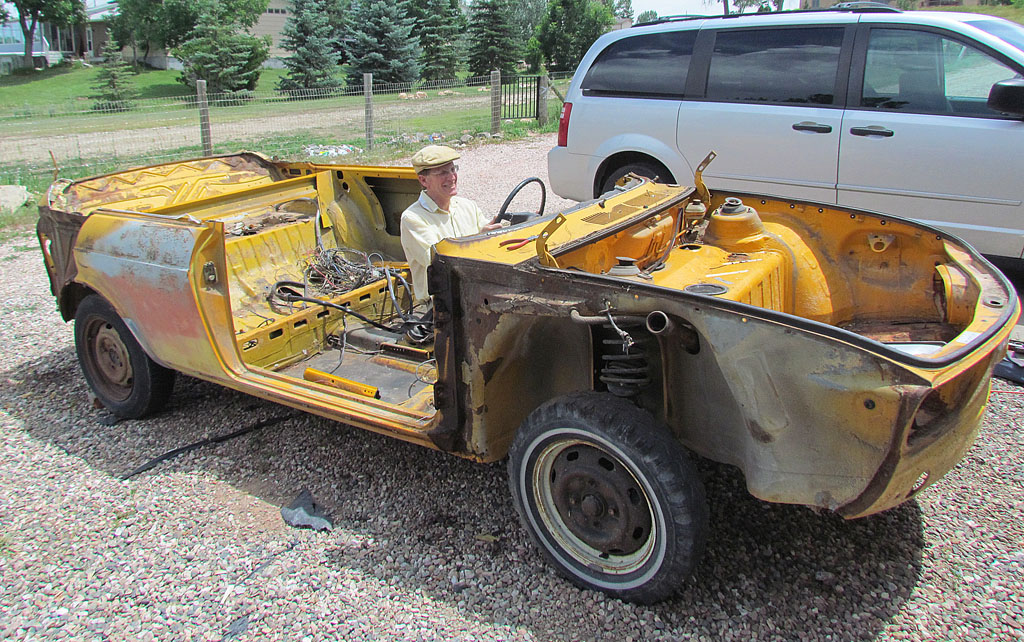
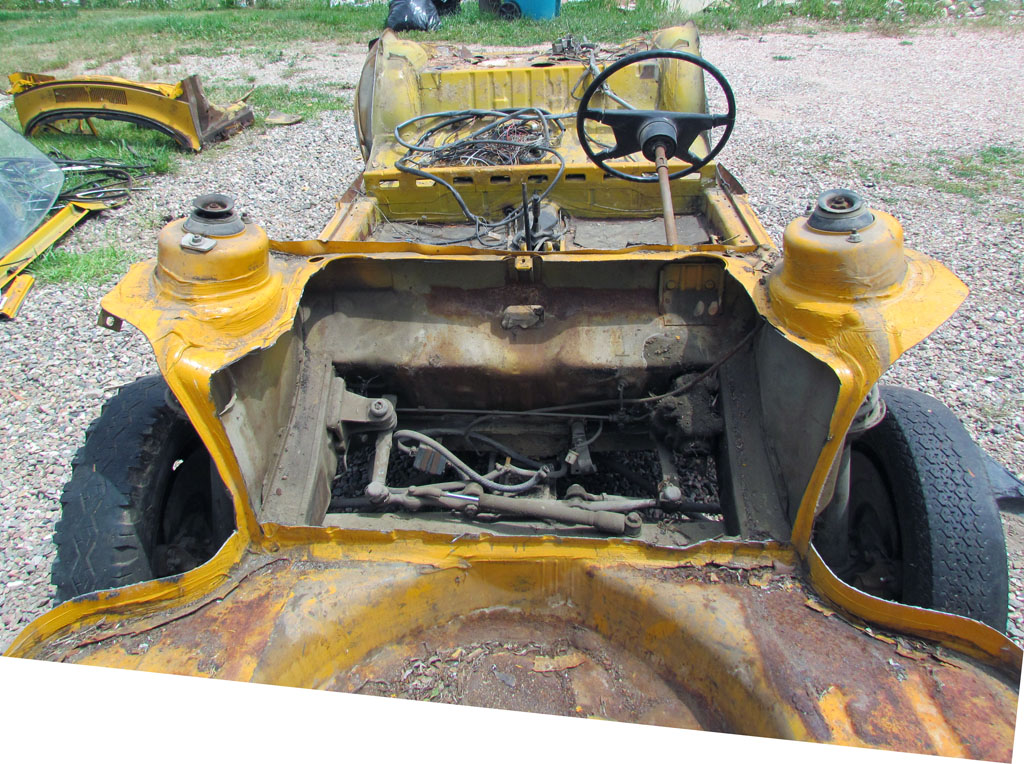
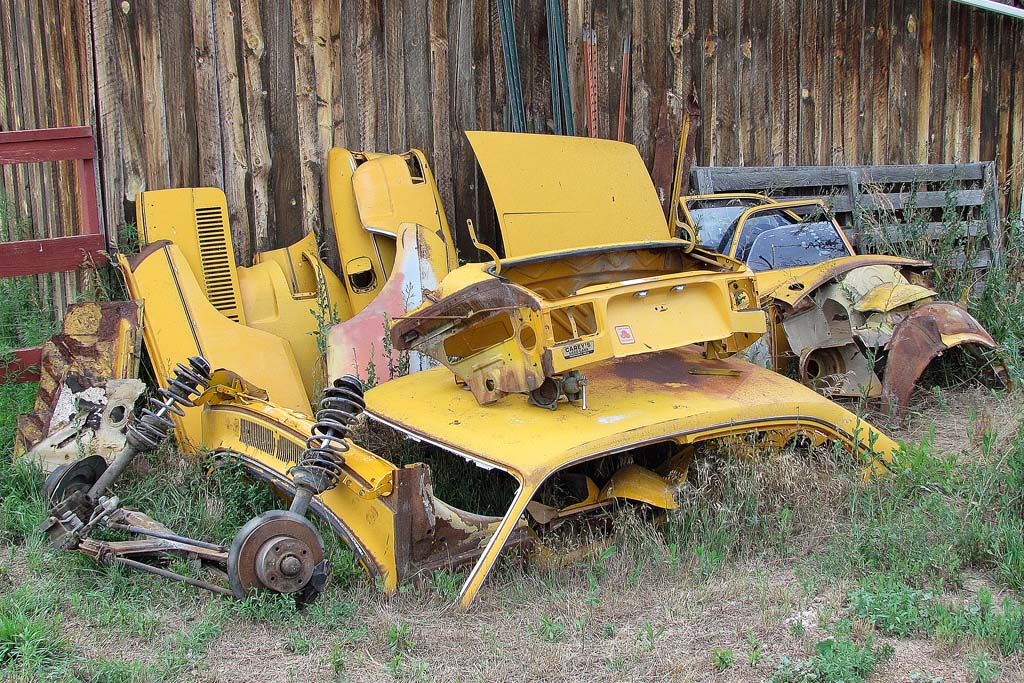
Remove fenders and dash.
JUNE 16-20
Decide to buy engine from VRBA's and have it rebuilt by Original Custom.
Rebuilt engine will increase from 67 HP to 127 HP.
Decide to install Porsche 914 5-speed transmission.
JUNE 21-22
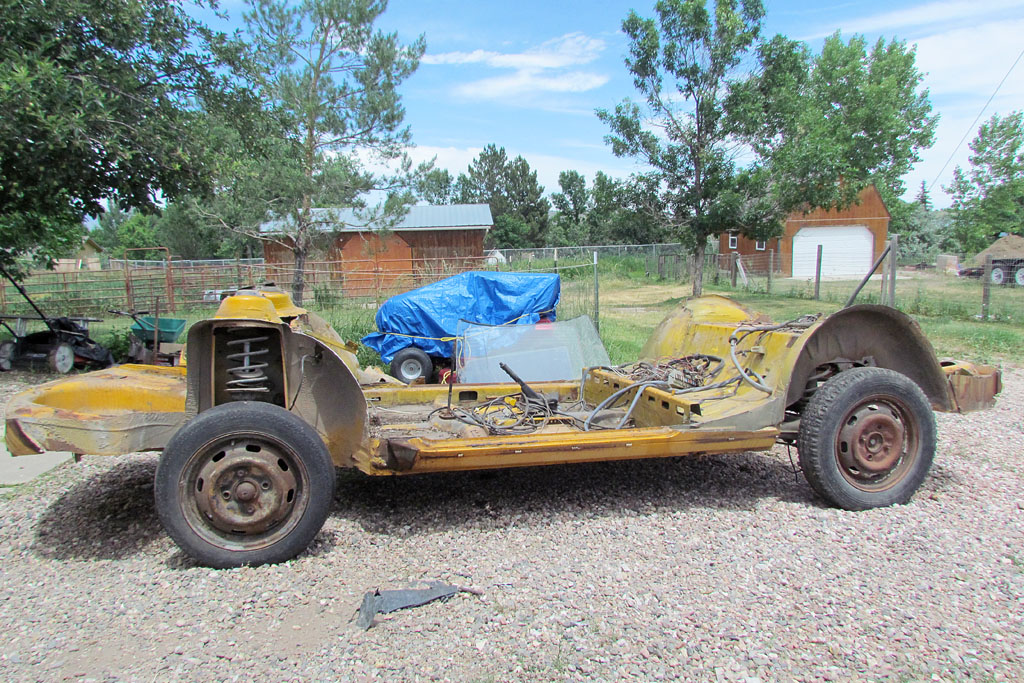
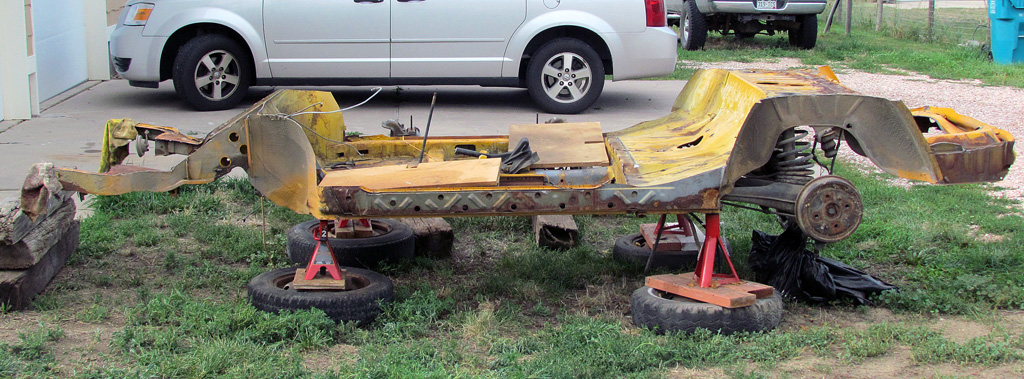
Remove hood, trunk, windows, gas tank. Cut off off body down to chassis.
Decide to use Corvair front suspension unit.
JUNE 23-29
Begin removing transmission
JULY 3
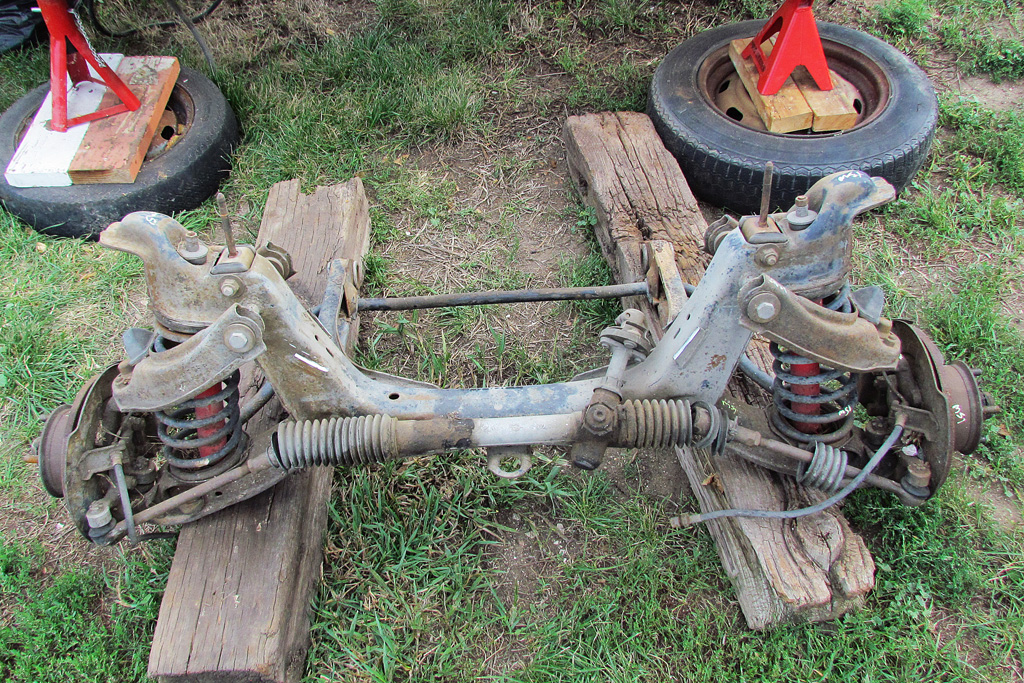
Front struts 12 inches too tall so get front end from '74 Opel Manta in junkyard (double wishbones and shocks inside coils.
JULY 4-23
Research transmissions. Decide to spend the bucks and get a Porsche 915 rebuilt tranny instead of a Porsche 901.
That simplifies the shifter adaptation problem and eliminates the tempermental shifting and adjustments of the 914 901 tranny.
Will have it rebuilt after it is pulled.
JULY 24
Buy 915 transmission and order rebuild from Poudre Sports Cars (fun guys who like fast cars).
Finalize details for T4 engine from a '76 bus. Vrba will start stripping it down to the core to ship to Custom Originals.
AUGUST 2-3
Back to work on the 412. Remove old 4-speed transmission (For Sale - any taker??), the gas heater above it, and the front end.
Then after a couple hours test positioning the Manta front end, decide how to cut down around the front frame.
Also trimmed off extra sheet metal here and there and the cut out the rusted floorboards.
Next stop... mount the front end. But first, some family events.
AUGUST 11
Remove heater lines from engine compartment to chassis side channels.
AUGUST 12-29
I tried removing the coil springs from the Manta front end.
As it turned out, even with a spring compressor, I still had to pry it out the last little bit.
But most of this time I was trying to figure out what to replace the coils with.
I had three choices: find a lighter duty coil and shocks, use a coil-over, or use a torsion bar.
The cheapest approach is to find another coil, but to get the right diameter, the compressed height under load does not match the original.
Complicating all that is determining where the front end will sit under a normal load.
My drawing says the wheel centers should sit six inches above the bottom of the chassis pan.
Unloaded, the rear wheels sit right at the bottom of the pan.
A coilover is not cheep, but is compact and somewhat adjustable in height.
But will it be enough?
A torsion bar allows much more adjustment in height, but adding one to the exising front end by welding on attachment parts might risk breaking under use.
The Porsche 914 and 911 used torsion bars, but they also used struts - both of which were too tall.
The Beetle uses torsion bars, and maybe I could make it work, but I already have a front end at about the right track.
I end up undecided for the time being.
AUGUST 30-SEPTEMBER 1
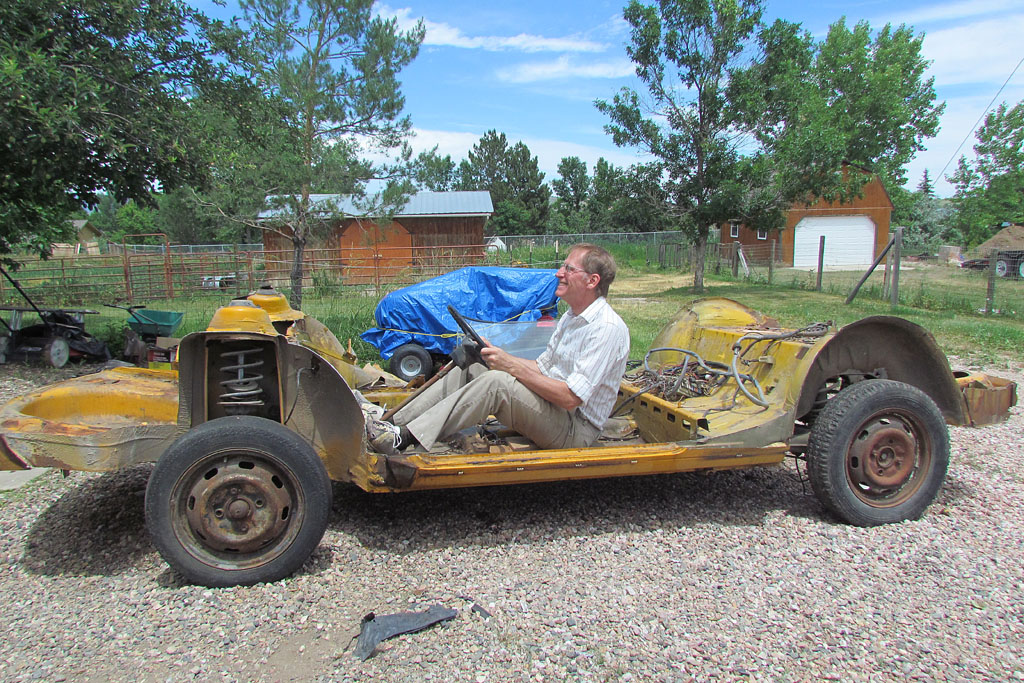
At long last, my neighbor and I got to do major surgery on the chassis.
Over Labor Day weekend, on Saturday we cut and shortened the chassis ten inches.
On Sunday we planned and began cutting the chassis to add the Manta front end.
On Monday we actually began welding it is place.
It is done enough to lift the chassis with the front end.
We discovered in the process that the frame halves needed to be recut to level them out - they slightly arched up in the middle.
But by the time we quit, the wheelbase was leveled out and 88 inches long.
Next stop... make the rear wheel shafts fit the 13 inch wheels.
SEPTEMBER 6-7
Now that the front end is on, I am wondering if it will sit at the right height.
The photo of the frame shows the rear wheel at full extension, held only by the shock.
But photos of the VW412 sitting normally have the wheel centerline an inch or so below the door sill.
Given the wheel centerline of the Monza and the fact of the 412 at-rest centerline,
that placed the top of the frame, i.e., the sill, at the sill line of the Monza.
THAT is much higher than I first planned!
But it can work... I think.
It will be a matter of carefully choosing a coilover for the front, given that the rear is already dialed in about right with the engine/tranny.
It also means that the floor pan must now be lowered about 3-1/2 inches so the seat will be down enough.
But there is a sticking point. The front half of the pan, in front of a frame cross member, which was under the original 412 front seat, is an inch or so higher then the original rear pan half.
Which means the driver's feet will rest higher than the base of the seat. Which means the driver will be in a greater reclining position.
I will have to test that one out, human factorially.
Two steps forward and one step back... or one problem solved and two created. Aargh.
SEPTEMBER 13-16
With the start of the school year, it has been very busy as activities recommence and I have had little time for the car, or anything else.
What's more, the weather is changing, which puts pressure on getting this chassis on its wheels.
I am still agonizing over determining how much wheel travel I actually have in the front... and how high the frame must sit in the body.
I removed a cover over the steering joint to accurately position photographically the lower arm pivot bolt and took new photos.
I had to because my drawings from the old photos resulted in the wheel rotating outward at the top of its travel, which could not be!!
And indeed it did not. I jacked the wheel up and it remained perpendicular to the ground with no apparent change of verticality.
My new drawing on the new photo confirmed that fact (refer to the replaced front end photo on the right), now that I had accurately placed centers of rotation of the arms.
And I could now predict how much travel I could expect: 5 inches.
And I could now get an close idea what length coilovers to look for: 13.25 at the extended position or shorter if I drill a new hole at the top.
I still can call upon more extension/length if I need.
And the track looks to work out perfectly matching the original at 53.5 inches.
Now to get the rear wheels redrilled for new studs at 4x100mm.
But perhaps the first biggest change to my plans is the discovery that the chassis must move up so that the top of the frame is sitting at the sill position of the Monza SS door.
That means the engine sits higher (less topside clearance but better muffler clearance) and the pan must be made lower.
I am planning on using VW bus seat frames and rails since they have a smaller width and thickness and position to the rails.
They sat right on the wheel well and I need to just about sit right on the floor.
Next up, it looks like more cutting and welding.
The gearshift position needs to come back nearly a foot and the safety brake will have to be displaced to the side or made a foot brake.
And the middle cross frame member should be moved forward to where the front end is welded to the pan.
SEPTEMBER 21-22
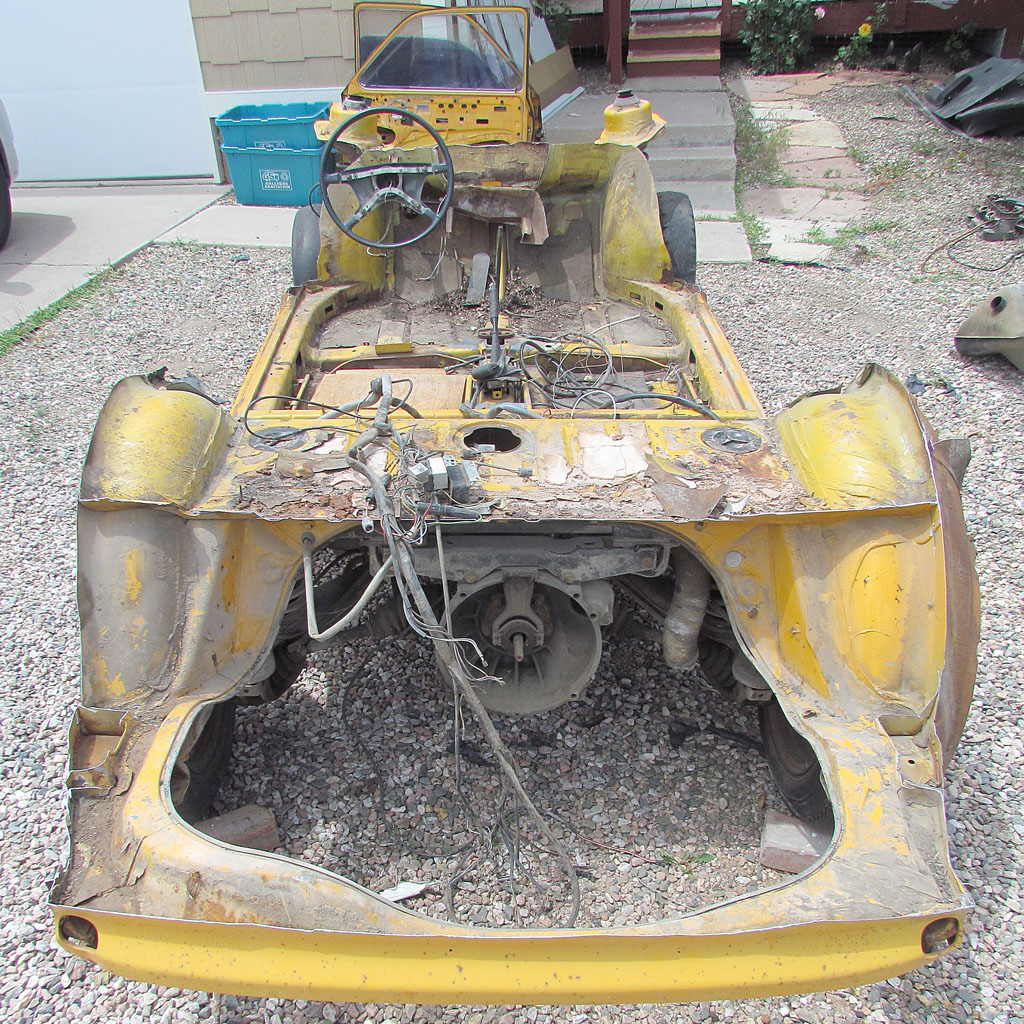
Since the gearshift needs to move back 14.5 inches and my measurements say I need to lower the floor pan 3-1/2 inches below the frame,
I made the decision to cut out the rest of the rusty floor pan and the frame members up to the rear of the front end member.
SEPTEMBER 27
We welded in a rectangular channel piece to act as a frame member to weld the rear of the front end to.
Then we bent and welded the side "rails" to extend down the floor pan.
We will weld on rails to the new front channel and to the rear panel where the gear shift rod goes thru, and then weld in a new floor panel.
I had thought of using the old roof or hood, but their compound curves make them difficult to flatten.
Then we will weld in the old gearshift segment of the center tunnel and add extensions to the new floor.
That should be pretty strong when we are done.
SEPTEMBER 28
I got in some paint remover, deruster, and undercoat remover and began testing them today.
I will report the results later. I am looking for products that don't make me a pariah cuz of the fumes.
SEPTEMBER 29
NOT! The undercoat remover I ordered did not work at all. I think the problem was that the undercoat was painted over.
YES (sort of) The DEKOTE paint remover does work, softening the paint. But keeping it wet enough is a problem here in Colorado.
And when it is soft, it still requires a lot of tedious, little-by-little scraping to begin to get it off.
I have decided it is not time effective to do so. I will deal with the rust and then paint it using paint that neutralizes the rust.
YES Rust-B-Gone rust remover does indeed work. I did not give it more than an hour to do its job, but that took care of the medium to light rust.
I will have to experiment with overnight on the harder stuff.
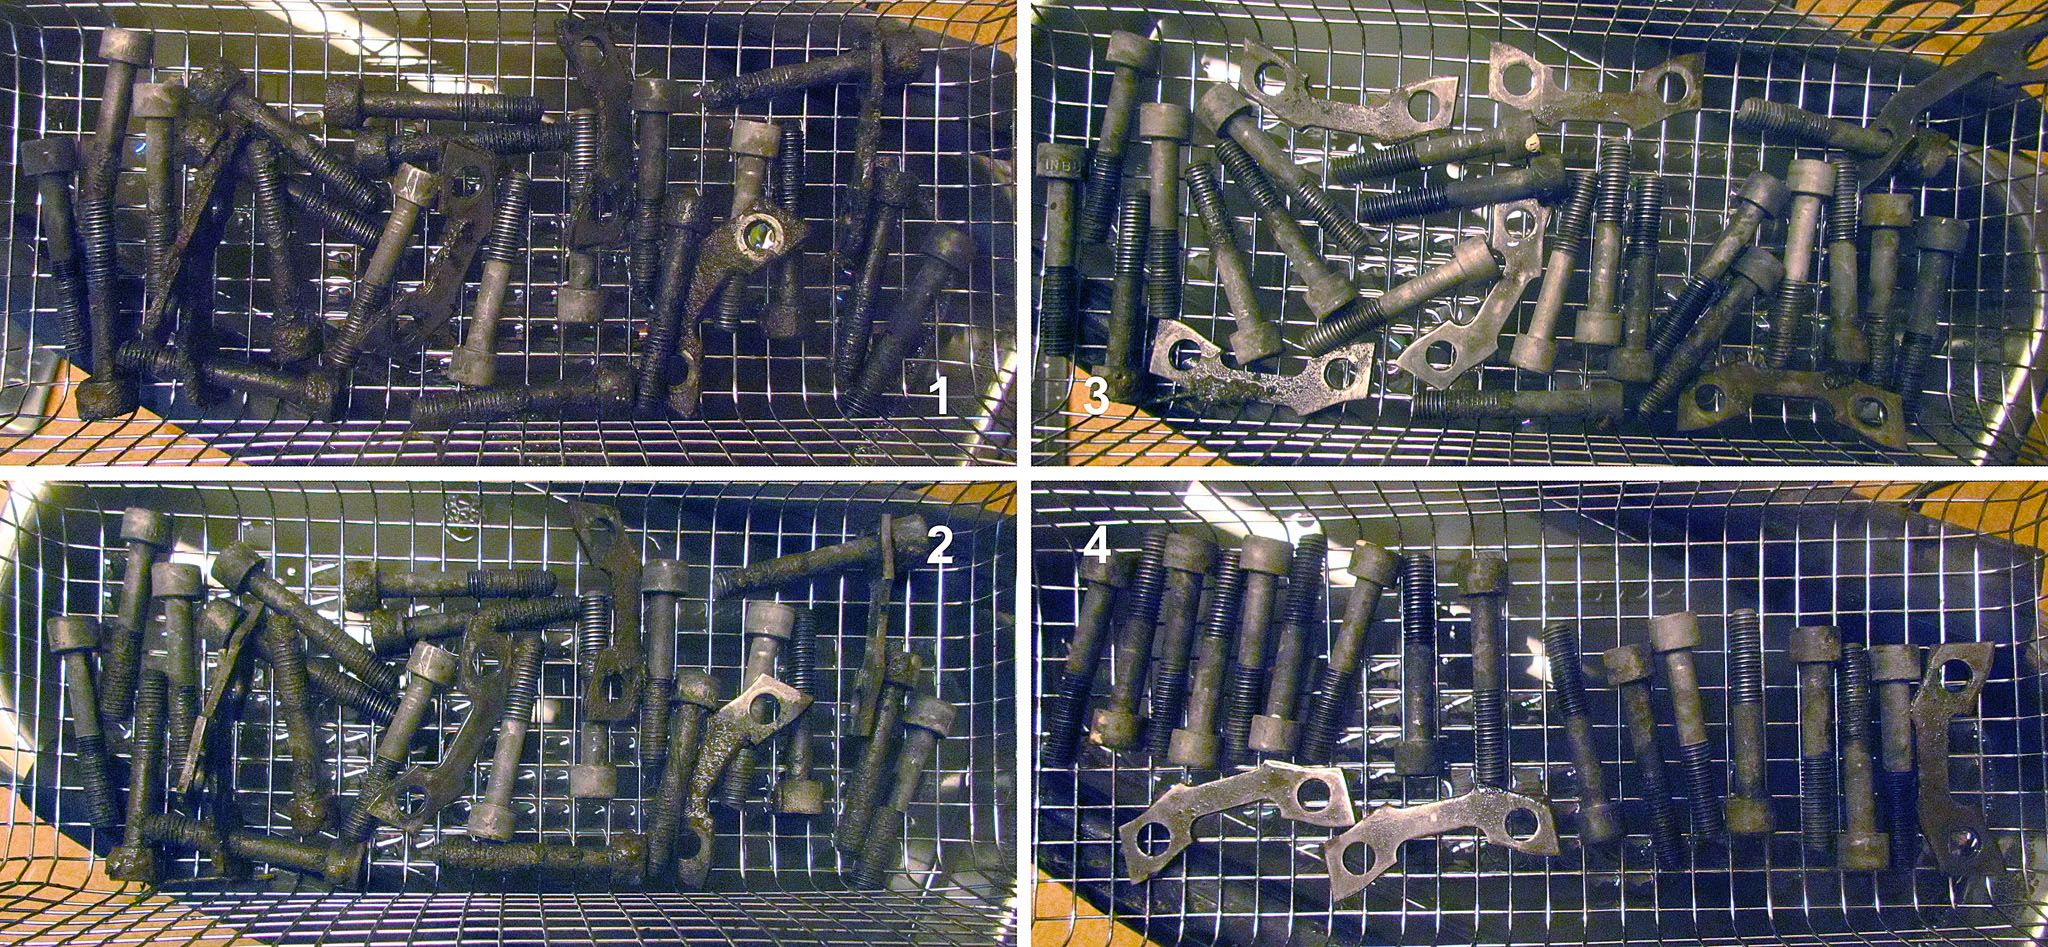
YES! Green cleaner degreaser mixed about 1:10 with water in an ultrasonic cleaner takes care of a lot of the gunk.
So much so that I have not needed to use anything more potent.
It did take from one to two hours for most items. Also, I removed what caked on stuff and as much old grease as I could.
I also discovered that I needed to rotate parts. The down side gets cleaner than the up side. Might be gravity, or the proximity to the transducer.
OCTOBER 7
After much brainstorming, I decided to use the floor bed of a pickup for the new floor pan.
It is strong yet light weight. So off to the junk yard today to find one, and I found one at a price I was happy with.
I cut out the piece I needed as soon as I got home.
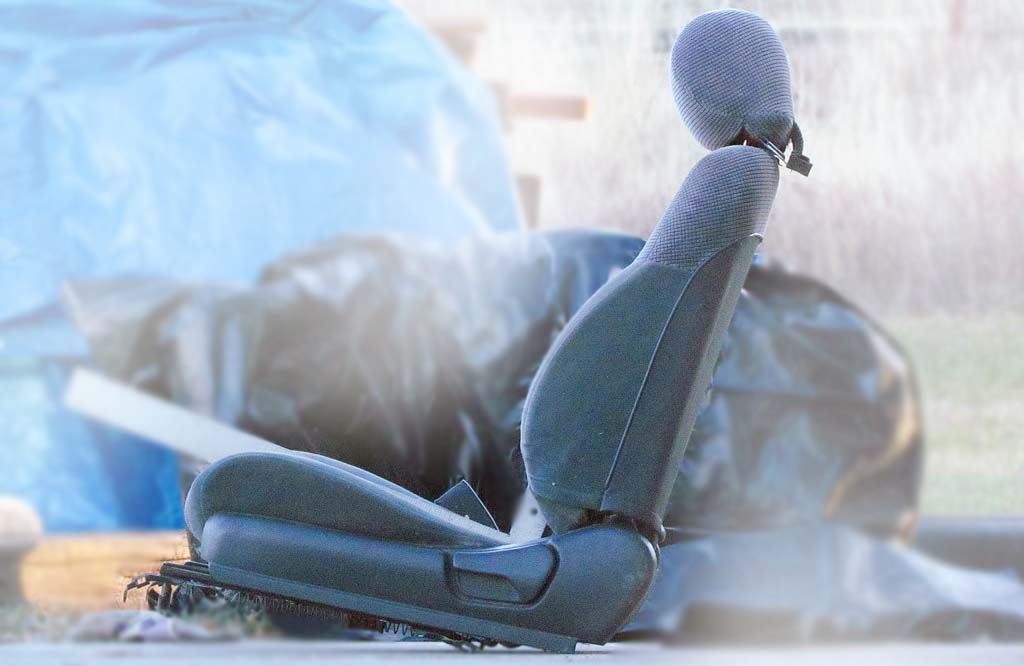
I also found some seats in good shape. I think they will work. They are the front seats of a '92 Celica convertible.
But if they don't, they too were very affordable.
OCTOBER 11
We got busy this morning and bent and welded in the front and rear floor pan rails.
The new pan was trimmed down. The underside support U-channels were cut down from 2" to 1" in height.
The top 1" was inserted in the bottom 1" and welded down. That saved an inch in clearance underneath, while making it even stronger.
Then the new pan was positioned and welded down. It is heavier than the original, but is sturdy and rust-free.
It sure feels good to see something going back together.
BTW - I put in one of the seats and it sits well with me in it. My feet just rest on the front pan rail.
DECEMBER 14
I spoke too soon. I ran into my first speed bump - the fancy rebuilt Porshce 915 transaxle!
It was not cheap, but it had five gears and could handle lots of horsepower.
When I compared the old 412 transaxle to the 915, my worst suspicion became convincing.
It would not fit without major structural cutting and welding.
The nose piece is the major problem.
The 412 was a unique design in which the nose has a rubber bumper collar that inserts into the structural beam on which the rear suspension hangs.
In addition, the transaxle and engine suspension points are 1) the nose collar, 2) the bell housing, and 3) the rear of the engine.
Did I want to cut into the suspension beam to adapt it? Not really.
What's more, I also suspect the relationship of the CV to the mainshaft is different,
which could have a serious impact on the half-axle driveshafts, specifically, changing their angle.
It is an odd thing with the 412, but the driveshafts actually angle back and down from the differential.
I wanted out-of-the-box solutions and not custom ones.
Better think this over. It looks like I will need to use the 412 transaxle, but will it handle the horsepower?
And will it let me even go fast enough?
After some research, the horsepower issue may be just within the design limit of, say, 50% overengineered.
As far as top speed, that looks to be as high as 95 mph - on 15 inch wheels. I'll be using 13 inch wheels.
Hmmm... it is not so much a function of the wheel as of the tire, but the two are related.
Maybe a top speed of only 82 mph?!?! That was all my 1958 Beetle could do... downhill!
But do I have any other choice? I will use the 412.
Check out 2015 for more progress!
- • Horn badge = Corvair horn badge
- • Tail light lens = C2 Corvette lens
- • Tail light bezels = '62 Olds F-85 tail light bezel
- • Side name emblem appears to be custom-made
- • Trunk name letters = Corvair trunk name letter
JUNE 1-16
Pursue buying Porsche 914 engine. Engine turns out to be wrong version.JUNE 14-15
Remove fenders and dash.JUNE 16-20
Decide to buy engine from VRBA's and have it rebuilt by Original Custom. Rebuilt engine will increase from 67 HP to 127 HP. Decide to install Porsche 914 5-speed transmission.JUNE 21-22
Remove hood, trunk, windows, gas tank. Cut off off body down to chassis. Decide to use Corvair front suspension unit.JUNE 23-29
Begin removing transmissionJULY 3
Front struts 12 inches too tall so get front end from '74 Opel Manta in junkyard (double wishbones and shocks inside coils.JULY 4-23
Research transmissions. Decide to spend the bucks and get a Porsche 915 rebuilt tranny instead of a Porsche 901. That simplifies the shifter adaptation problem and eliminates the tempermental shifting and adjustments of the 914 901 tranny. Will have it rebuilt after it is pulled.JULY 24
Buy 915 transmission and order rebuild from Poudre Sports Cars (fun guys who like fast cars). Finalize details for T4 engine from a '76 bus. Vrba will start stripping it down to the core to ship to Custom Originals.AUGUST 2-3
Back to work on the 412. Remove old 4-speed transmission (For Sale - any taker??), the gas heater above it, and the front end. Then after a couple hours test positioning the Manta front end, decide how to cut down around the front frame. Also trimmed off extra sheet metal here and there and the cut out the rusted floorboards.Next stop... mount the front end. But first, some family events.
AUGUST 11
Remove heater lines from engine compartment to chassis side channels.AUGUST 12-29
I tried removing the coil springs from the Manta front end. As it turned out, even with a spring compressor, I still had to pry it out the last little bit. But most of this time I was trying to figure out what to replace the coils with. I had three choices: find a lighter duty coil and shocks, use a coil-over, or use a torsion bar. The cheapest approach is to find another coil, but to get the right diameter, the compressed height under load does not match the original. Complicating all that is determining where the front end will sit under a normal load. My drawing says the wheel centers should sit six inches above the bottom of the chassis pan. Unloaded, the rear wheels sit right at the bottom of the pan. A coilover is not cheep, but is compact and somewhat adjustable in height. But will it be enough? A torsion bar allows much more adjustment in height, but adding one to the exising front end by welding on attachment parts might risk breaking under use. The Porsche 914 and 911 used torsion bars, but they also used struts - both of which were too tall. The Beetle uses torsion bars, and maybe I could make it work, but I already have a front end at about the right track. I end up undecided for the time being.AUGUST 30-SEPTEMBER 1
At long last, my neighbor and I got to do major surgery on the chassis. Over Labor Day weekend, on Saturday we cut and shortened the chassis ten inches. On Sunday we planned and began cutting the chassis to add the Manta front end. On Monday we actually began welding it is place. It is done enough to lift the chassis with the front end. We discovered in the process that the frame halves needed to be recut to level them out - they slightly arched up in the middle. But by the time we quit, the wheelbase was leveled out and 88 inches long.Next stop... make the rear wheel shafts fit the 13 inch wheels.
SEPTEMBER 6-7
Now that the front end is on, I am wondering if it will sit at the right height. The photo of the frame shows the rear wheel at full extension, held only by the shock. But photos of the VW412 sitting normally have the wheel centerline an inch or so below the door sill. Given the wheel centerline of the Monza and the fact of the 412 at-rest centerline, that placed the top of the frame, i.e., the sill, at the sill line of the Monza. THAT is much higher than I first planned!But it can work... I think. It will be a matter of carefully choosing a coilover for the front, given that the rear is already dialed in about right with the engine/tranny. It also means that the floor pan must now be lowered about 3-1/2 inches so the seat will be down enough. But there is a sticking point. The front half of the pan, in front of a frame cross member, which was under the original 412 front seat, is an inch or so higher then the original rear pan half. Which means the driver's feet will rest higher than the base of the seat. Which means the driver will be in a greater reclining position. I will have to test that one out, human factorially.
Two steps forward and one step back... or one problem solved and two created. Aargh.
SEPTEMBER 13-16
With the start of the school year, it has been very busy as activities recommence and I have had little time for the car, or anything else. What's more, the weather is changing, which puts pressure on getting this chassis on its wheels.I am still agonizing over determining how much wheel travel I actually have in the front... and how high the frame must sit in the body. I removed a cover over the steering joint to accurately position photographically the lower arm pivot bolt and took new photos. I had to because my drawings from the old photos resulted in the wheel rotating outward at the top of its travel, which could not be!!
And indeed it did not. I jacked the wheel up and it remained perpendicular to the ground with no apparent change of verticality. My new drawing on the new photo confirmed that fact (refer to the replaced front end photo on the right), now that I had accurately placed centers of rotation of the arms. And I could now predict how much travel I could expect: 5 inches.
And I could now get an close idea what length coilovers to look for: 13.25 at the extended position or shorter if I drill a new hole at the top. I still can call upon more extension/length if I need.
And the track looks to work out perfectly matching the original at 53.5 inches.
Now to get the rear wheels redrilled for new studs at 4x100mm.
But perhaps the first biggest change to my plans is the discovery that the chassis must move up so that the top of the frame is sitting at the sill position of the Monza SS door. That means the engine sits higher (less topside clearance but better muffler clearance) and the pan must be made lower. I am planning on using VW bus seat frames and rails since they have a smaller width and thickness and position to the rails. They sat right on the wheel well and I need to just about sit right on the floor.
Next up, it looks like more cutting and welding. The gearshift position needs to come back nearly a foot and the safety brake will have to be displaced to the side or made a foot brake. And the middle cross frame member should be moved forward to where the front end is welded to the pan.
SEPTEMBER 21-22
Since the gearshift needs to move back 14.5 inches and my measurements say I need to lower the floor pan 3-1/2 inches below the frame, I made the decision to cut out the rest of the rusty floor pan and the frame members up to the rear of the front end member.SEPTEMBER 27
We welded in a rectangular channel piece to act as a frame member to weld the rear of the front end to. Then we bent and welded the side "rails" to extend down the floor pan. We will weld on rails to the new front channel and to the rear panel where the gear shift rod goes thru, and then weld in a new floor panel. I had thought of using the old roof or hood, but their compound curves make them difficult to flatten. Then we will weld in the old gearshift segment of the center tunnel and add extensions to the new floor. That should be pretty strong when we are done.SEPTEMBER 28
I got in some paint remover, deruster, and undercoat remover and began testing them today. I will report the results later. I am looking for products that don't make me a pariah cuz of the fumes.SEPTEMBER 29
NOT! The undercoat remover I ordered did not work at all. I think the problem was that the undercoat was painted over.YES (sort of) The DEKOTE paint remover does work, softening the paint. But keeping it wet enough is a problem here in Colorado. And when it is soft, it still requires a lot of tedious, little-by-little scraping to begin to get it off. I have decided it is not time effective to do so. I will deal with the rust and then paint it using paint that neutralizes the rust.
YES Rust-B-Gone rust remover does indeed work. I did not give it more than an hour to do its job, but that took care of the medium to light rust. I will have to experiment with overnight on the harder stuff.
YES! Green cleaner degreaser mixed about 1:10 with water in an ultrasonic cleaner takes care of a lot of the gunk. So much so that I have not needed to use anything more potent. It did take from one to two hours for most items. Also, I removed what caked on stuff and as much old grease as I could. I also discovered that I needed to rotate parts. The down side gets cleaner than the up side. Might be gravity, or the proximity to the transducer.
OCTOBER 7
After much brainstorming, I decided to use the floor bed of a pickup for the new floor pan. It is strong yet light weight. So off to the junk yard today to find one, and I found one at a price I was happy with. I cut out the piece I needed as soon as I got home.I also found some seats in good shape. I think they will work. They are the front seats of a '92 Celica convertible. But if they don't, they too were very affordable.
OCTOBER 11
We got busy this morning and bent and welded in the front and rear floor pan rails. The new pan was trimmed down. The underside support U-channels were cut down from 2" to 1" in height. The top 1" was inserted in the bottom 1" and welded down. That saved an inch in clearance underneath, while making it even stronger. Then the new pan was positioned and welded down. It is heavier than the original, but is sturdy and rust-free.It sure feels good to see something going back together.
BTW - I put in one of the seats and it sits well with me in it. My feet just rest on the front pan rail.
DECEMBER 14
I spoke too soon. I ran into my first speed bump - the fancy rebuilt Porshce 915 transaxle! It was not cheap, but it had five gears and could handle lots of horsepower. When I compared the old 412 transaxle to the 915, my worst suspicion became convincing. It would not fit without major structural cutting and welding.The nose piece is the major problem. The 412 was a unique design in which the nose has a rubber bumper collar that inserts into the structural beam on which the rear suspension hangs. In addition, the transaxle and engine suspension points are 1) the nose collar, 2) the bell housing, and 3) the rear of the engine. Did I want to cut into the suspension beam to adapt it? Not really. What's more, I also suspect the relationship of the CV to the mainshaft is different, which could have a serious impact on the half-axle driveshafts, specifically, changing their angle. It is an odd thing with the 412, but the driveshafts actually angle back and down from the differential. I wanted out-of-the-box solutions and not custom ones. Better think this over. It looks like I will need to use the 412 transaxle, but will it handle the horsepower? And will it let me even go fast enough?
After some research, the horsepower issue may be just within the design limit of, say, 50% overengineered. As far as top speed, that looks to be as high as 95 mph - on 15 inch wheels. I'll be using 13 inch wheels. Hmmm... it is not so much a function of the wheel as of the tire, but the two are related. Maybe a top speed of only 82 mph?!?! That was all my 1958 Beetle could do... downhill! But do I have any other choice? I will use the 412.
Check out 2015 for more progress!
The Build--2014
January - May

1st ROW
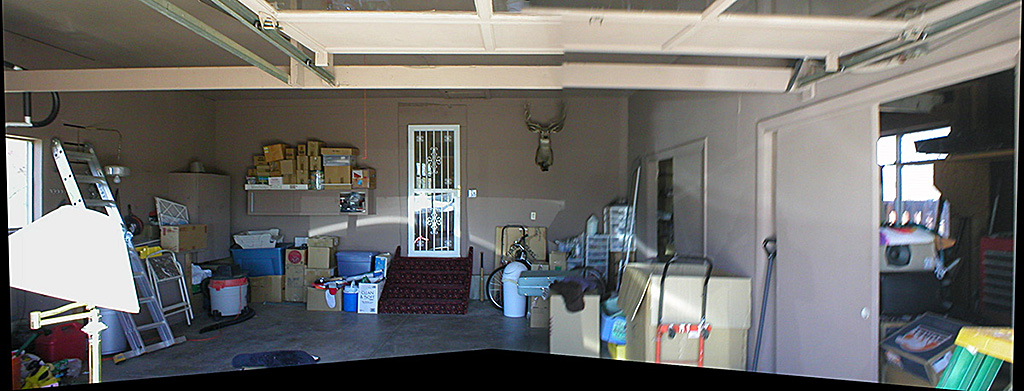
(L) The garage as we found it moving in.
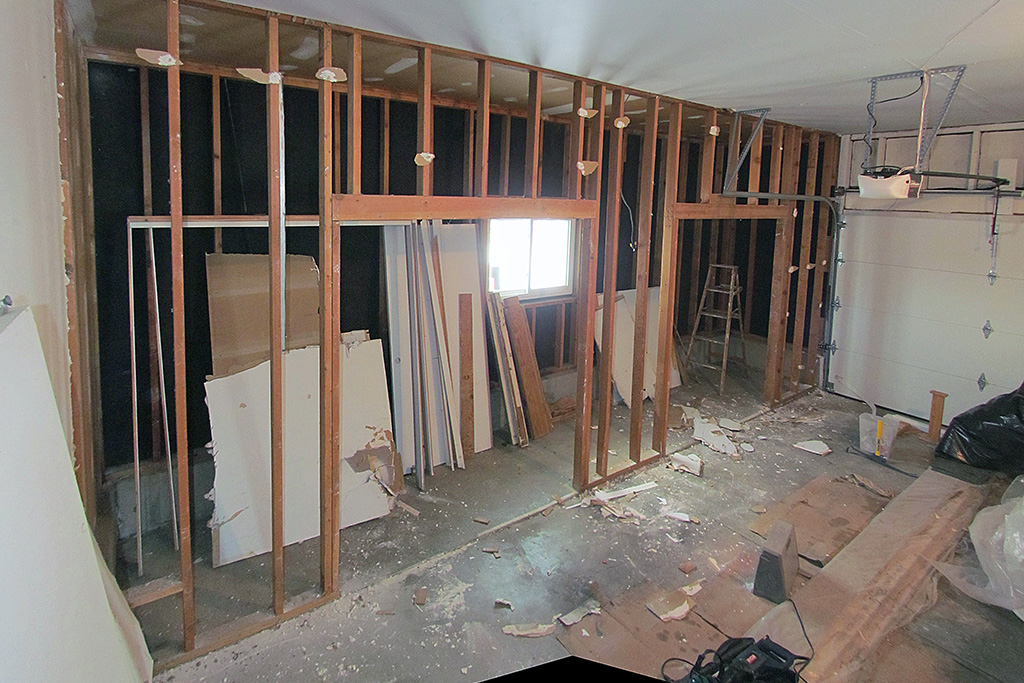
(C) Begin by tearing down the storage area divider wall.
(R) Build 3-foot dee shelving in the storage area and along the back wall.
2nd ROW
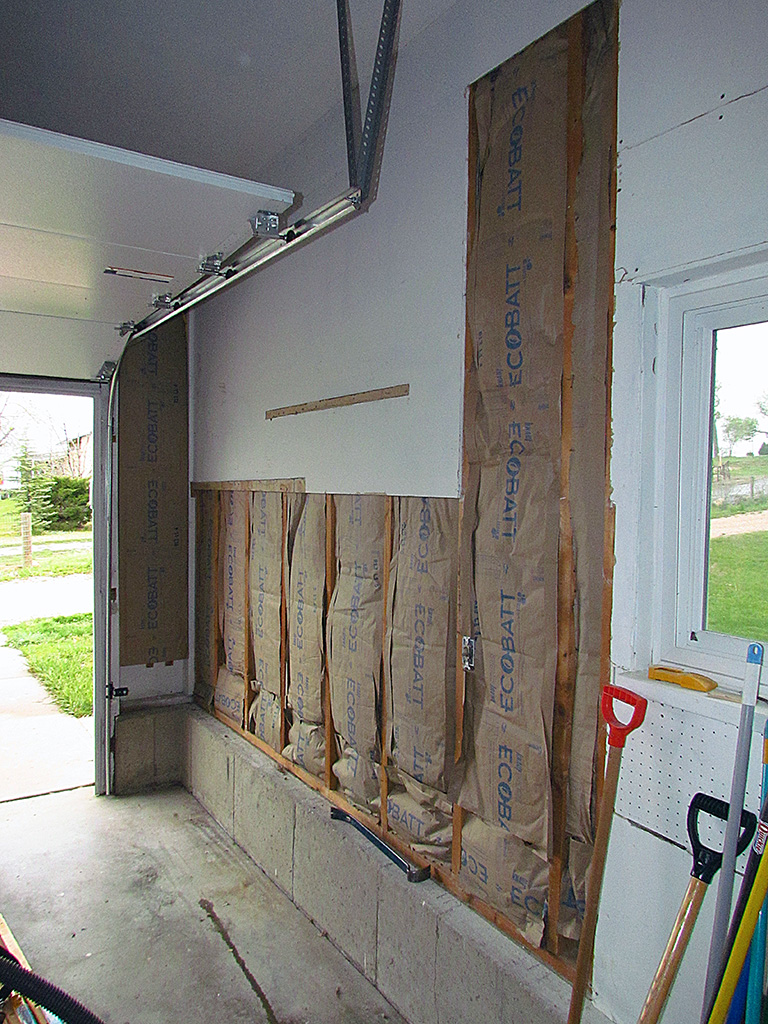
(L) Insulated all walls and the attic.
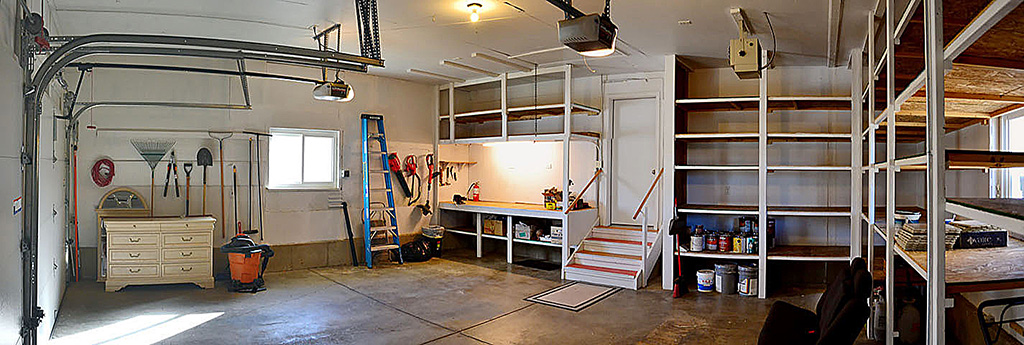
(R) The completed garage, with the new work bench + shelving along back wall, plus an electric 220V space heater. Although the storage held twice as much as before, we filled it the first weekend.
June - July

1st ROW
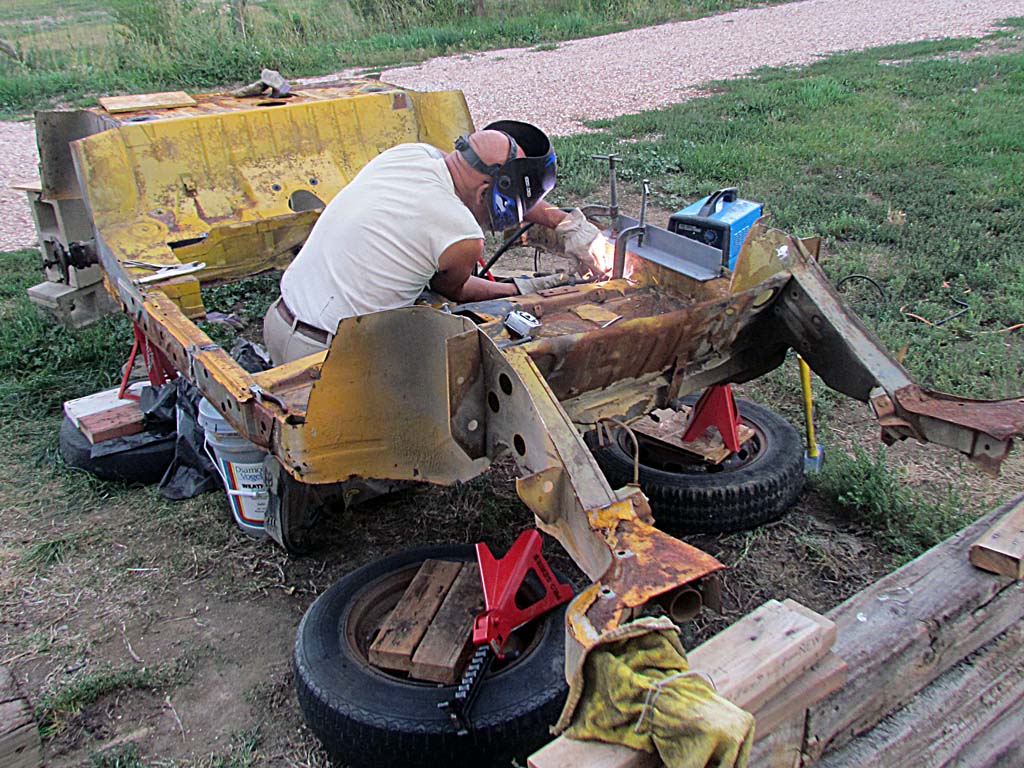
(L) Fenders, trunk, and hood removed - doors soon to follow
(C) A VW 412 convertible!... actually is looks like an amphibious DUKW.
(R) That is all we cut down to on the first pass. It took the better part of a day with a saber saw and a grinder with a cutting disk.
2nd ROW
(L) from the rear
(C) from the front
(R) Testing it out for size
3rd ROW
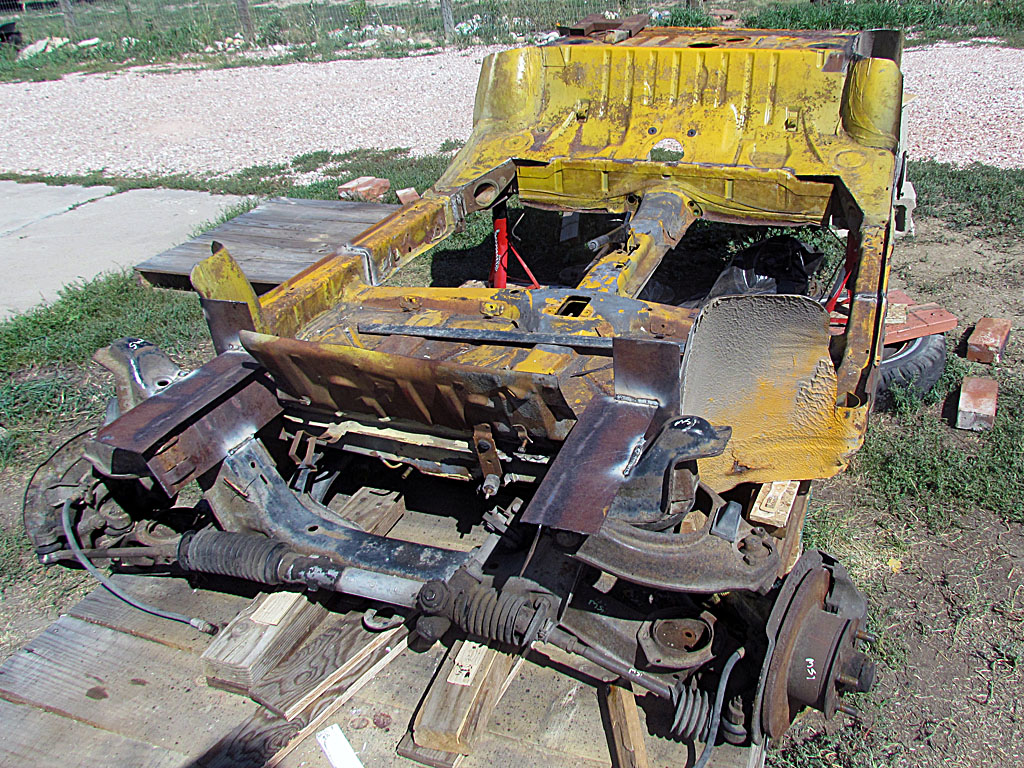
(L) Removing the front end from a '74 Opel Manta, or more accurately, a Buick Opel.
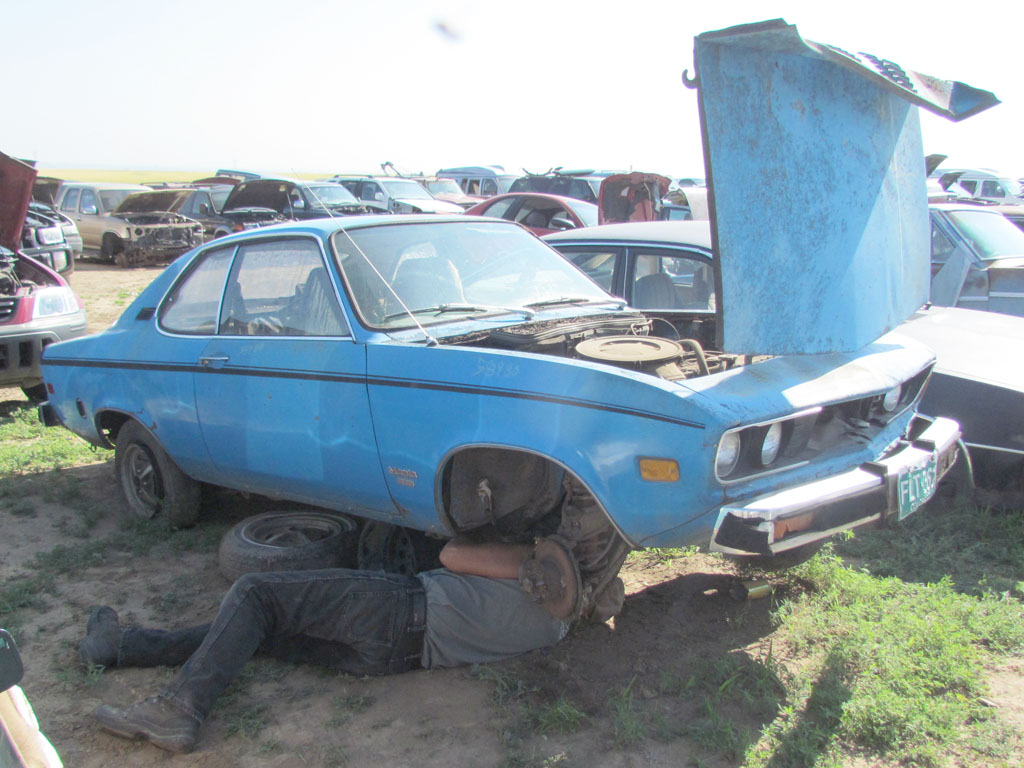
We went to the salvage yard and looked over Mustang IIs and the Corvairs. The Mustangs were welded onto the unitized body and the Corvairs had drum brakes up front. Resigning myself to having to replace the drums with disks, we walked back out. And then my eye caught site of a lone Manta. "Self" I said, "that is a German-made car and might have a front end I want and be adaptable to the VW?!" And sure enough, it did!
(C) The front end (front view) from the Manta.
(R) More cuts after removing the front end, tranny, & heater. It is starting to look like a frame now. There is not much more that will need to be taken apart except shortening it. Having come this far, I can now evaluate if it would have been better just to build a frame. Maybe so... maybe so.
4th ROW
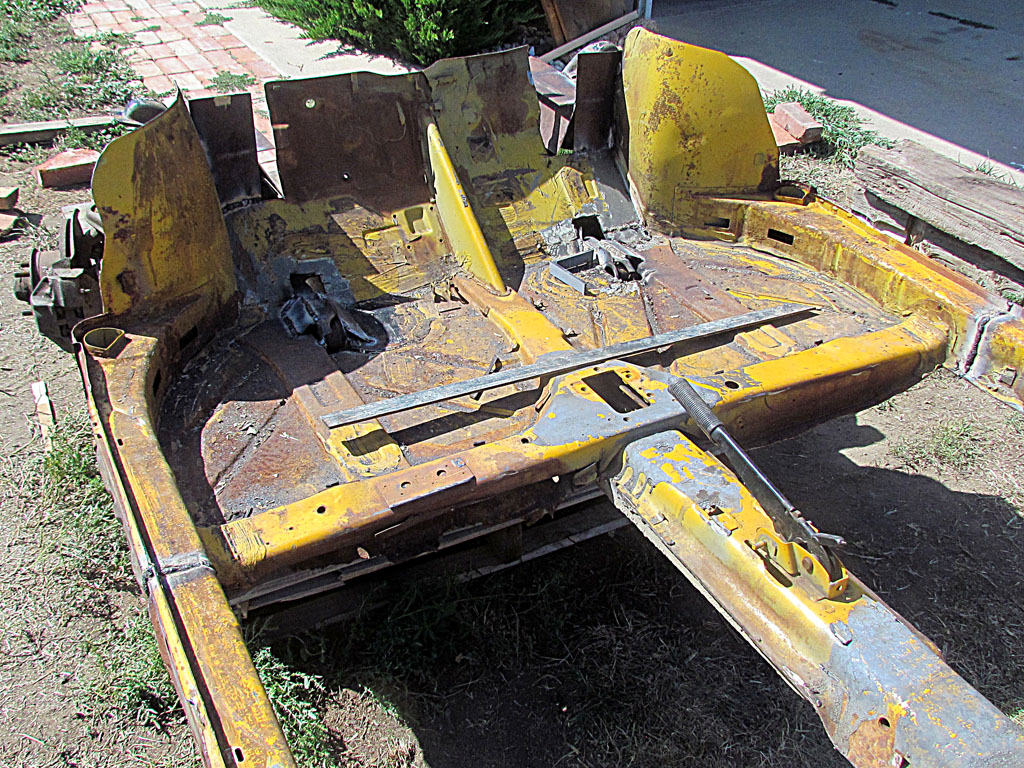
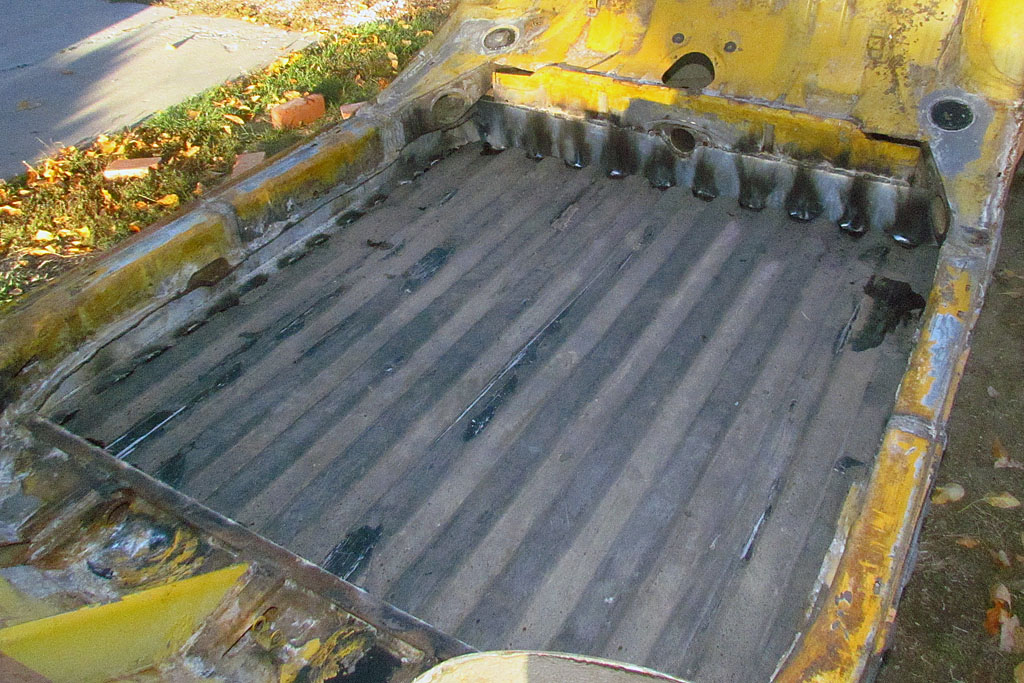
(L) Good soil will grow anything! That is a lot of sheet metal awaiting scrap. Actually, it will be put to use for floorboards and reinforcement pieces.
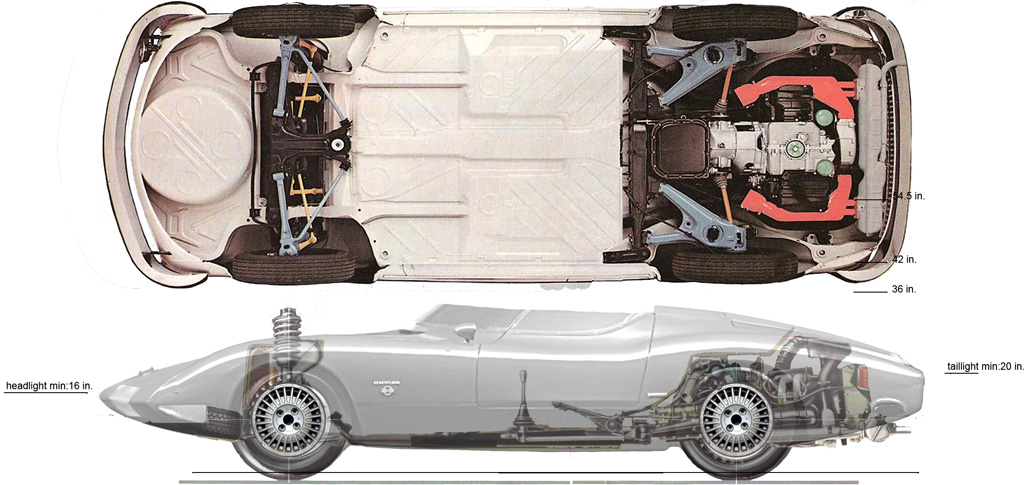
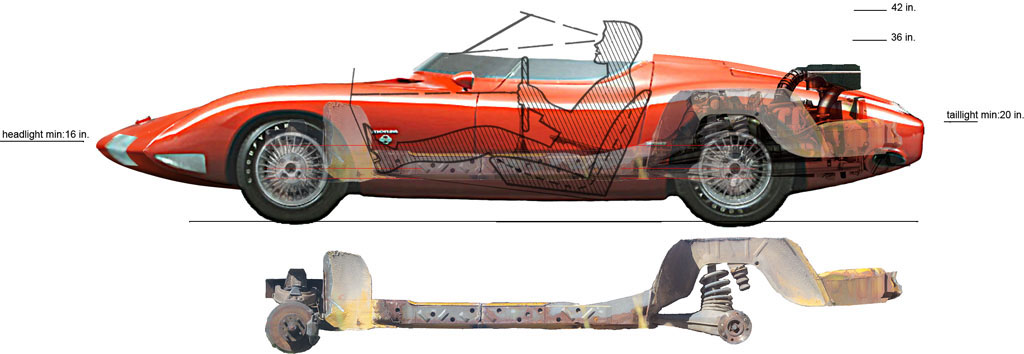
(C) This is a 1/10 overlay image showing the arrangement of the 412 relative to the Monza. This way I can begin to calculate measurements for placement and clearances.
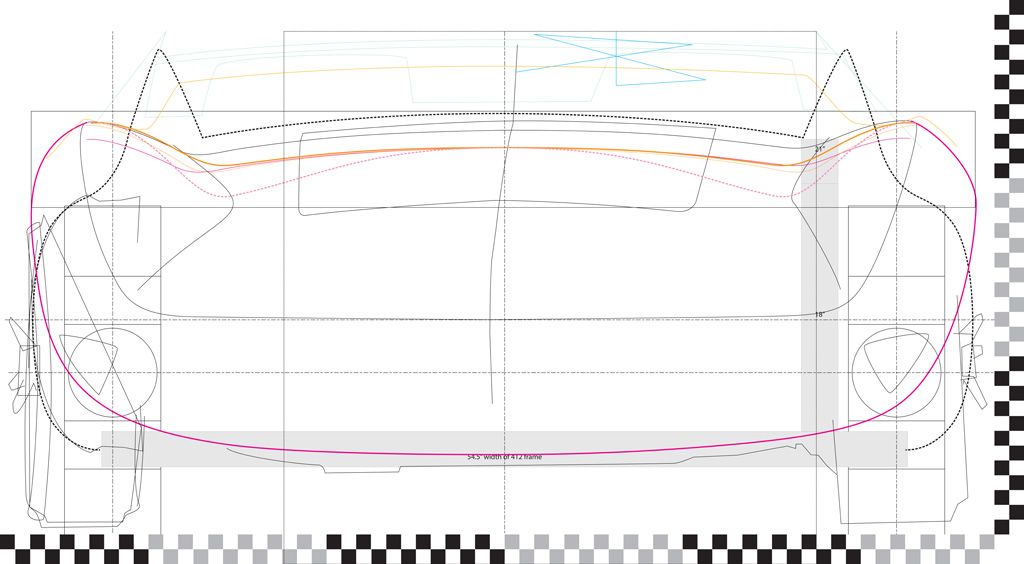
(R) This drawing is based on perspective reconstructions of photos. I have printed it full size to make a cut-out silhouette especially for the front end to really make sure it fits within the body shell.
5th ROW
(L) When the engine comes back, here is the expected power curve. And it should have twice the horsepower!

1st ROW
(L) Shortening the frame
(C1) The front end partially welded in place
(C2) Note how the front end sway bar attachment frame had to protrude above the pan. It is solid - just not pretty yet.
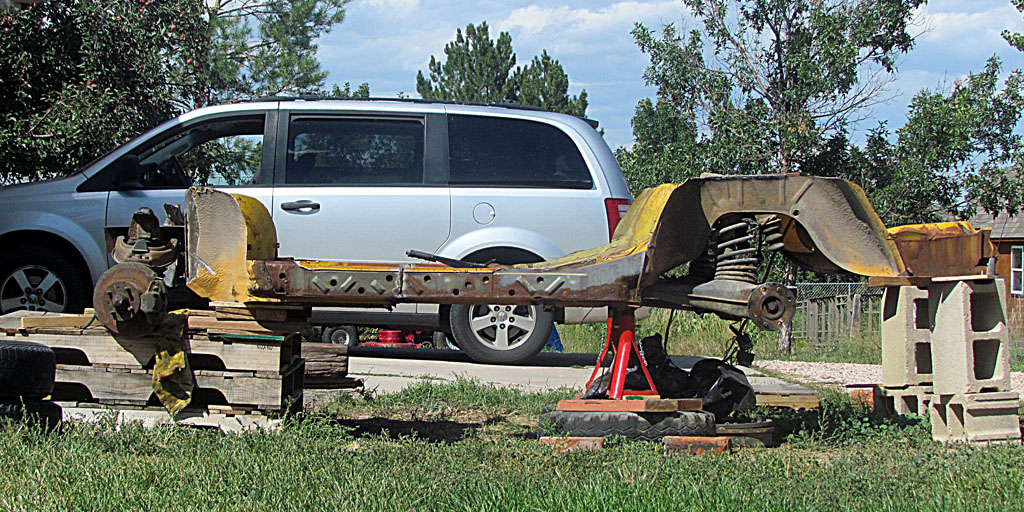
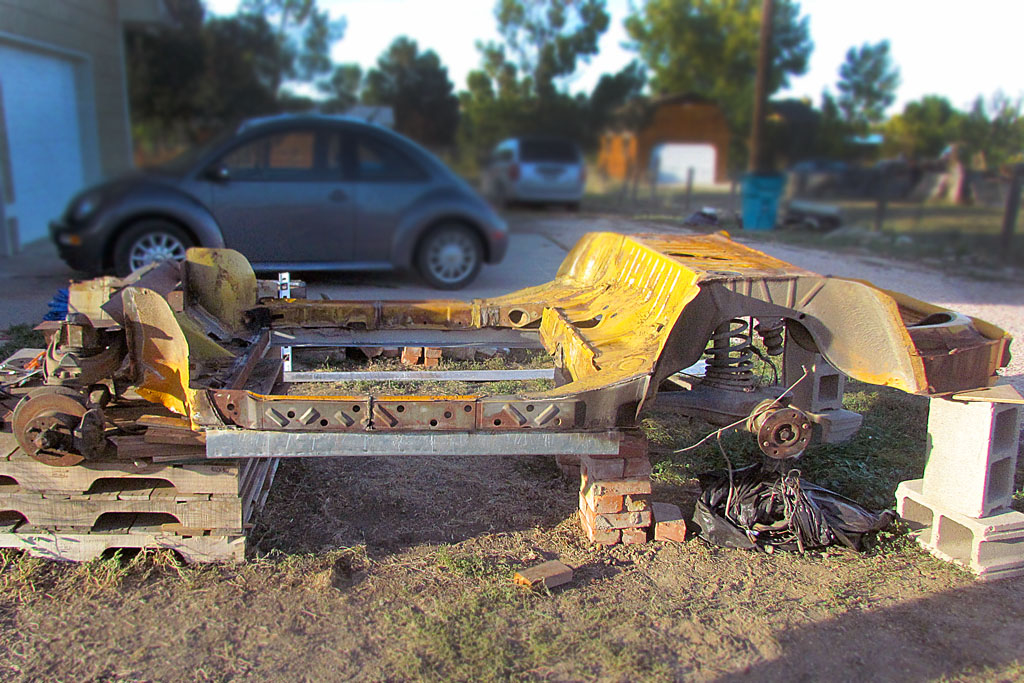
(R) The frame in profile with the front end in place <
(L) After lots of measureing and noodling, here is where I think the body must go on the frame. The frame by itself is shown below. The scale when printed is 1/24th. Oh - that big black thing over the engine is the original air intake/cleaner. Obviously is has to be replaced.
(C) This telephoto of the front end is used to determine how much wheel travel will happen for a given shock/coilover travel. I have decided NOT to use springs because I cannot confidently predict ride height and travel. A coilover allows some adjustability. For the record, my datum is the center of the disk brake - the part the wheel bolts onto. It is 4-15/16" in diameter.
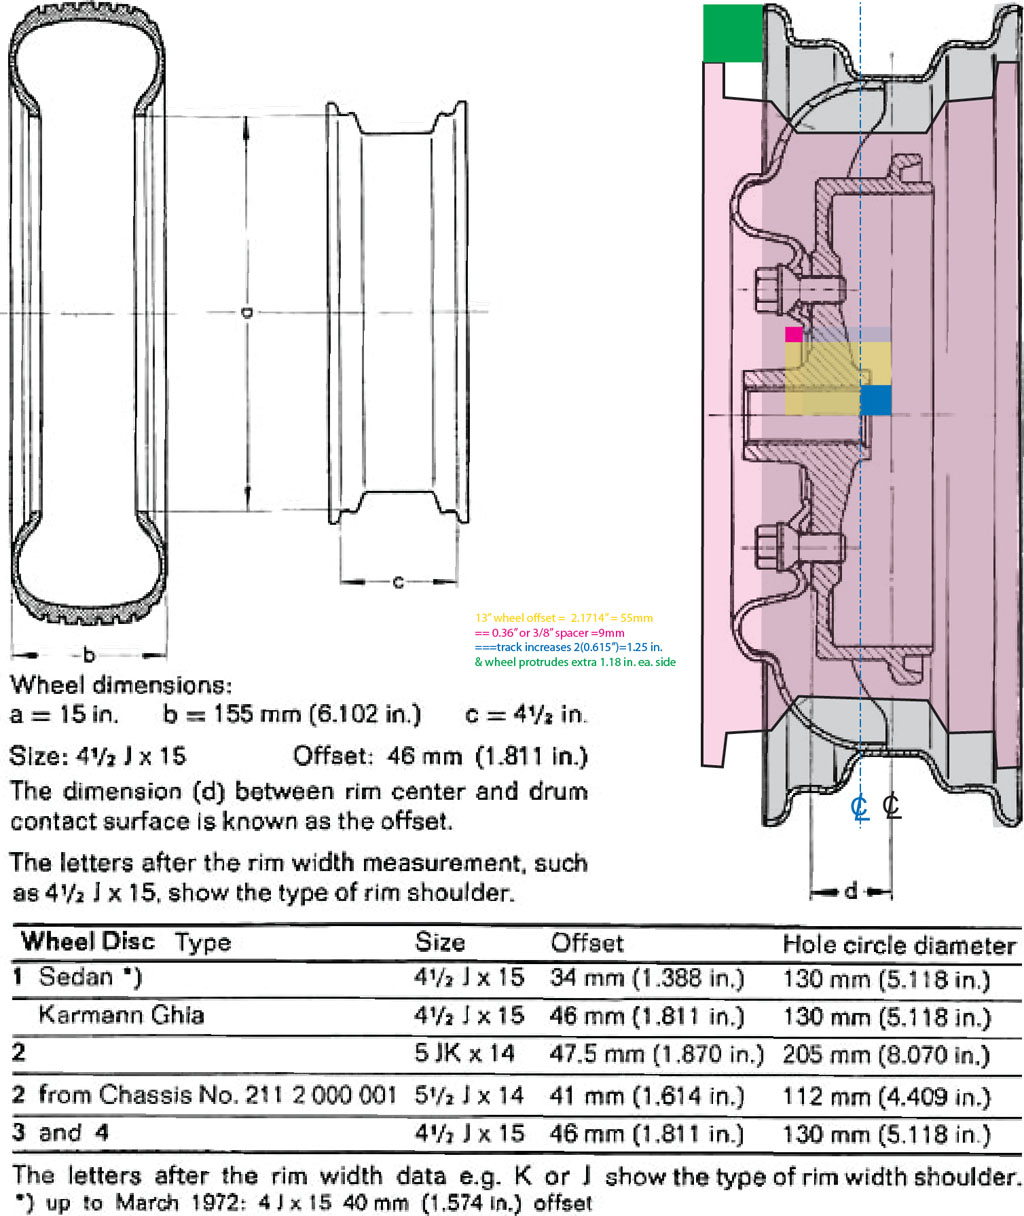
(R) Since I am using the existing rear suspension and rear drums, the problem is how to fit the new wheels. That means determining backspace. The magenta is the new wheel, gray is the old. The new wheel will require a 3/8" thick spacer to keep the same distance from the IRS member.
3rd ROW
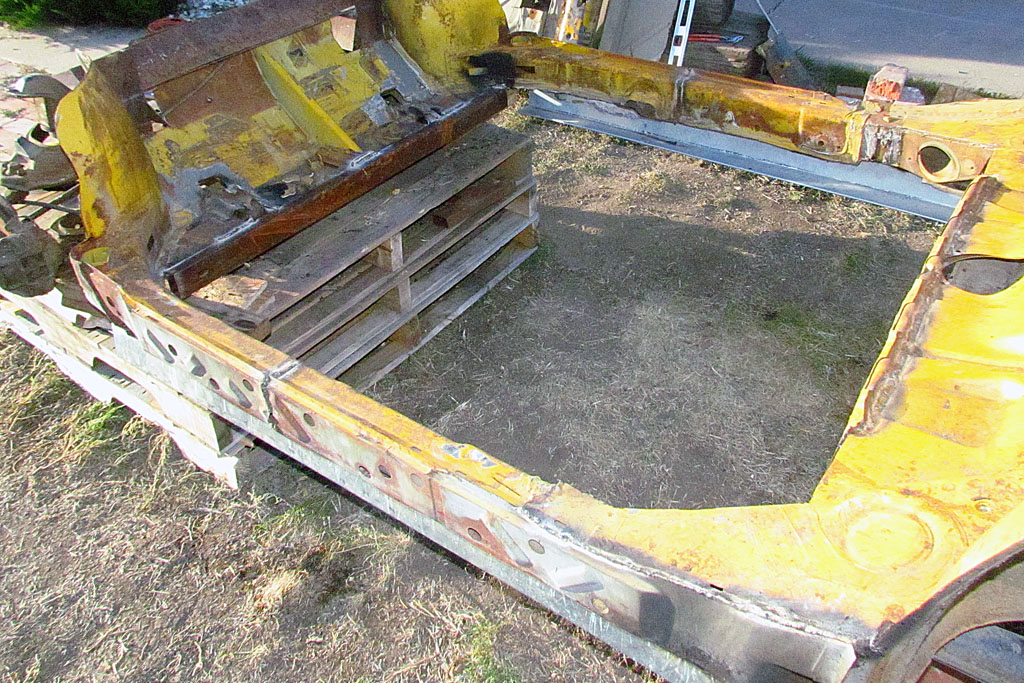
(L) The chassis after cutting out the floor pan and cross frame members. The new channel up front and side rails are in place.
(C) Side view showing how the side rails look. They are 3-1/2 inches in height.
(R) ...And with side rails all around and the new floor pan in place! It looks very good! And strong, too!

(L) Before/after showing the effectiveness of an hour of DeKote deruster.
(C) The first trial of the ultrasonic cleaner and Green Cleaner on the drive shaft bolts. 1= 1/2 hour, 2 = 1 hour, 3= 1/-1/2 hour plus rotating parts, 4 = 2 hours. The parts were greasier than they looked in #1.
(R) The '92 Celica seat
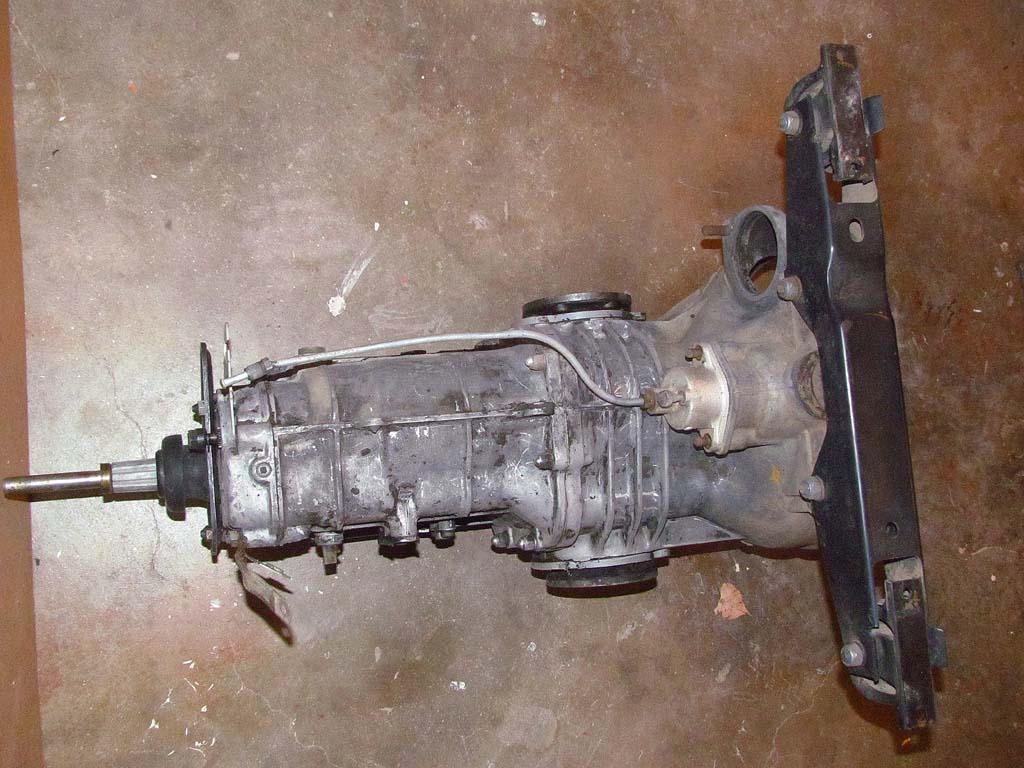
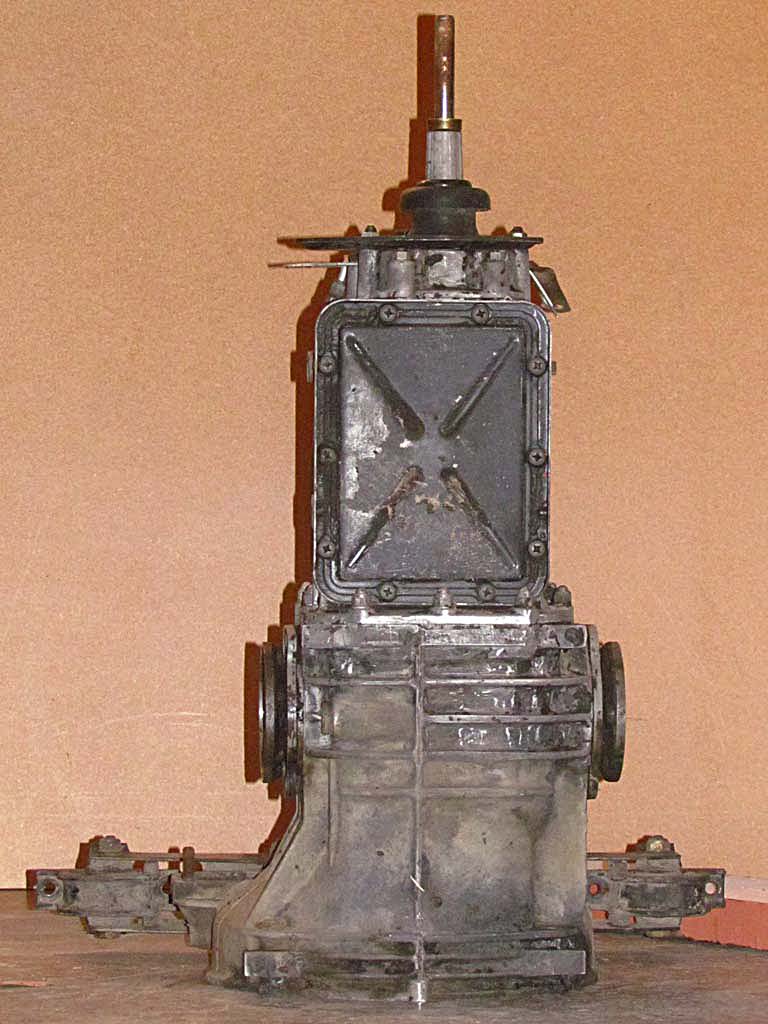
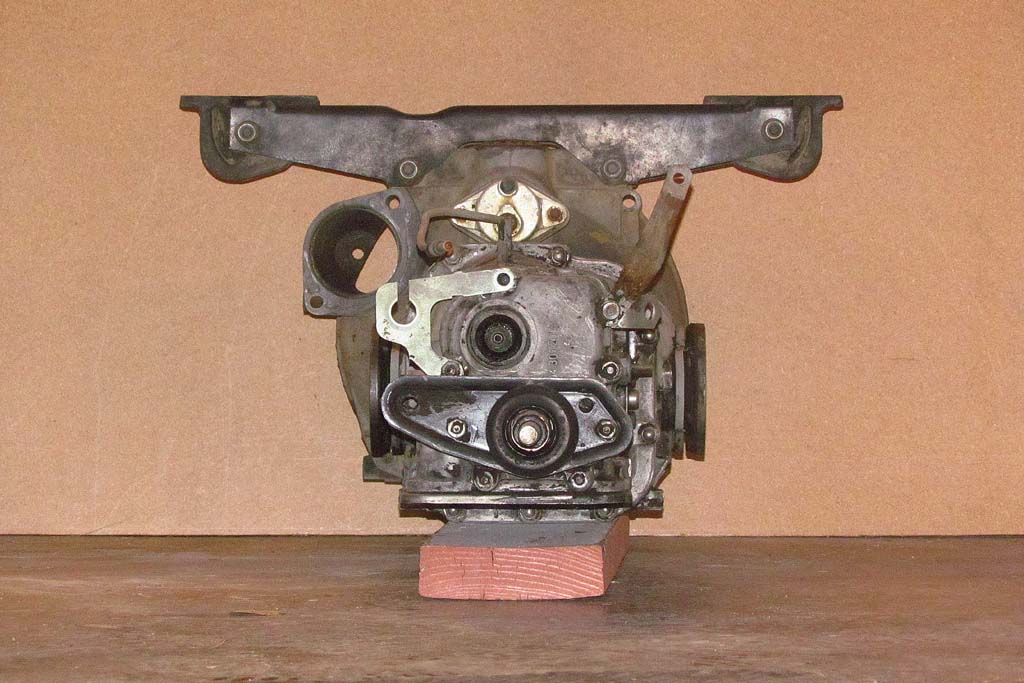
VW 412 Transaxle
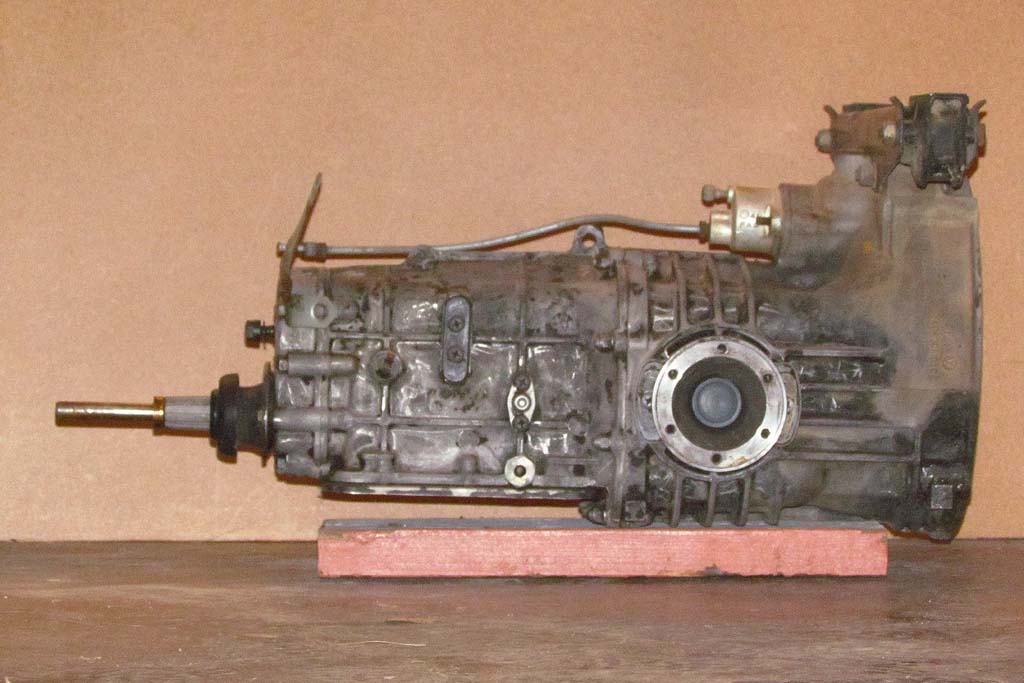
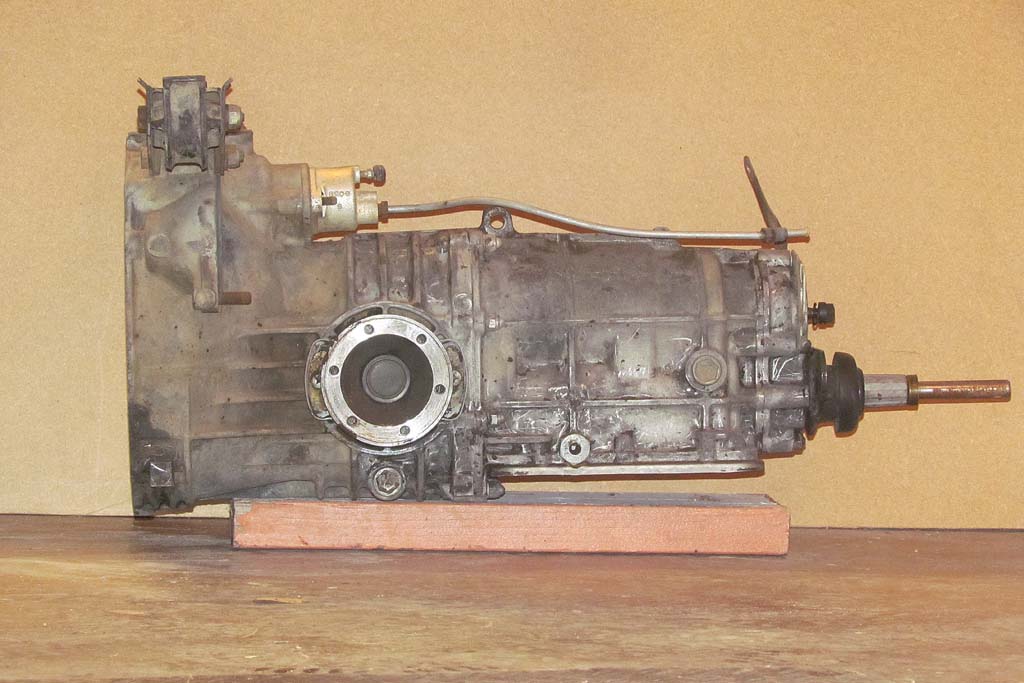
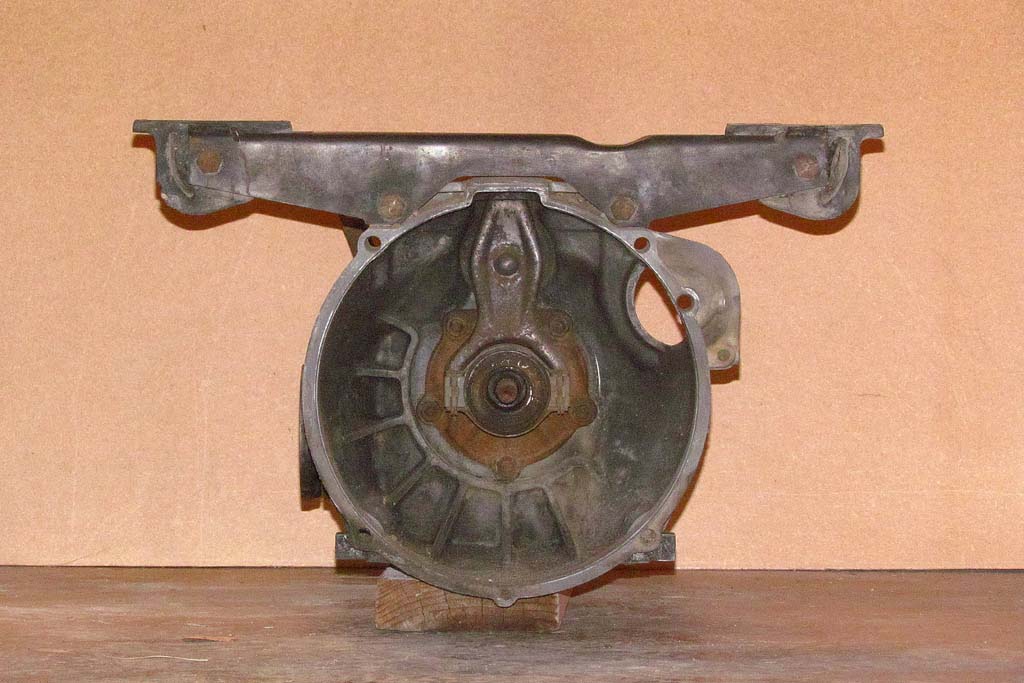
1st ROW
(L) 412 transaxle - left side
(C) 412 transaxle - right side
(R) 412 transaxle - top side
2nd ROW
(L) 412 transaxle - underside
(C) 412 transaxle - front
(R) 412 transaxle - rear
3rd ROW
Comparing the 412 transaxle (gray) to the 901 transaxle (black line).
Centering on the clutch shaft, note that the CVs are slightly misaligned vertically.
But the BIG problem is the 2-3/4" difference in vertical positioning of the shift lever.
That means having to drop the shift rod to the gearshift, or rais the engine in the bay. No can do!